Tuesday, May 1, 2018

Extension Methods (C#)


Purpose:

Enable us to add methods to existing types without creating a new derived type, recompiling, or otherwise modifying the original type.

Why:

Sometimes, when using system library, the built-in funciton might not be suitable enough for our needs. Therefore, we need to write some customized function to deal with it. We might creat Util class and put our new function inside it.

For example:
public static class Util {
        public static string ConvertStringForSomePurpose(string s) {
            // todo
            return result;
    }
}

class Program {
    static void Main(string[] args) {
            string s = “test”;
            var newString = Util. ConvertStringForSomePurpose (s);
    }
}


We have another way to satisfy this purpose with Extension Methods.


Extension Methods are a special static method. It need the special key word called ‘this’. In addition, it should be the first parameter.
public static class Util {
        public static string ConvertStringForSomePurpose(this  string s) {
            // todo
            return result;
    }
}

class Program {
        static void Main(string[] args) {
            string s = “test”;
            var newString = s. ConvertStringForSomePurpose();
    }
}


Furthermore, it is widely used when doing lots of LINQ query.


For example, assume we already have some query to get all the students who are male.
// First Query
Var students = from s in students
                           select s.Gender = ‘Male’;
                                   

Unfortunately, clients want to get not only the Male students, but also, they want all selected male students are over 18 ages.  But we do not want to modify this query, because this query has been used by another function already. In order not to modify the first Query, we can use extension methods to handle it.

Public static IQueryable <Student> Valid(this IQueryable <Student> query) {
        Var adultMaleStudents = from q in query
                                           Where q.Age > 18
                                           Select q;
        return adultMaleStudents;
}

// After first Query
var validStudents = students.Valid();

Therefore, we do not need to modify the original query at all.

Friday, April 13, 2018

GIT Ignore


Purpose:

Sometimes, we do not want to commit the sensitive file such as config file to git. In order to handle it, we can use .gitignore file to claim that which files will be excluded for the committing.

Step 1:

Create a file called “.gitignore”
touch .gitignore


Step 2:

Write the untracked file’s name to “.gitignore” file
echo xxx.xxx >> .gitignore


Step 3:

Sometimes, if you want to remove some committed files from git, you need to do the following commands
git rm --cached xxx.xxx


Step 4:

The normal way to commit
git commit -m "Remove the committed untracked file"
git push


Thursday, March 22, 2018

Code First Technique with Azure

Purpose:

Steps by steps to build a ASP.NET MVC project with code first and publish to Azure

Azure Portal

Create Resource Group

*Login Azure portal, and Select “Resource groups” on the side bar


Create Database

*Login Azure portal, and Select “SQL databases” on the side bar -> click “Add”


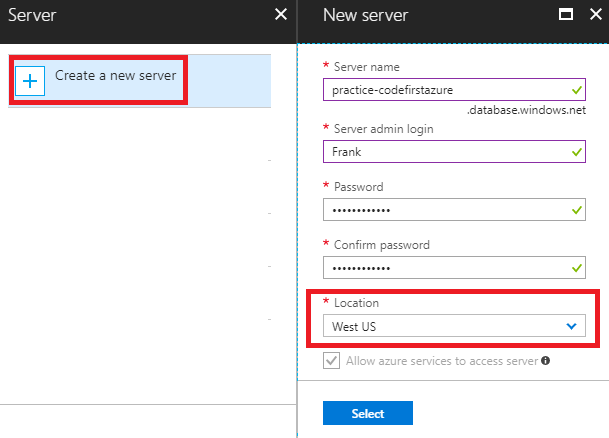
*Select the Resource group we created before.Select the Server for this database


*If you selected the one who has already serve a free database, it will show some error message like the following picture.


*Set the firewall for database server
    1. Click “Set server firewall”


    2. Add the client IP address to this rule


-------------------------------------------------

Connect DB to ASP.NET MVC Project

      *Create ASP.NET MVC project

      *Install Entity Framework

          - Tools -> NuGet Package Manager -> Manage NuGet Package for Solution…


*     *Add connection string
           a. Right click project -> Properties -> Settings
           b. Select “Connection string” Type and click the right extend button


      c. Select “Microsoft SQL Server”

    
      d. Type “server name” from the Azure portal. In addition, select the database we created before.


      *Create Model
           a. Create a class named People.cs


      b. Note: The Primary Key is named by ID or PeopleID

      *Create DBContext
           a. Created a folder named “Infrastructure”, and then created a class named “MyDbContext
           b. This class should inherit DbContext (We can think this coordinates Entity Framework functionality)
           c. The DbSet is Table.
           d. The “DefaultContext” is the name we specified.


      e. That specified name of database could be set on Web.config


      *Create View
@Html.ActionLink("Put", "PutData", "Home", null, null)
@Html.ActionLink("Get", "ReadData", "Home", null, null)

@foreach (var ppl in ViewBag.ppls)
{
    @Html.Raw("" + ppl.Name + “<br>”);
}

      *Create Controller
public ActionResult PutData() {
                var db = new MyDbContext();
                var ppl = new People();
                ppl.Name = "TEST" + DateTime.Now.ToString();
                db.Peoples.Add(ppl);
                db.SaveChanges();
                return RedirectToAction("Succcess", "Home");
}

public ActionResult Succcess()
{
                ViewBag.Message = "Your data is put successfully.";
                return View();
}

public ActionResult ReadData() {
                var db = new MyDbContext();
                var ppls = db.Peoples.ToList();
                ViewBag.ppls = ppls;
                return View();
}

a. If we click the first link “Put”, the test data will be inserted to our database.
b. If we click the second link “Get”, as the picture, the records will be loaded from database.
      *Result


-------------------------------------------------


Use MS SQL Server to Check

      *Type the server name from Azure Portal


      *Extend it and view the design


-------------------------------------------------

Publish to Azure

1    *Right click the project -> Publish
*Click Create new with the option “Microsoft Azure App Service”
*Select the resource group we created before.
*Created new App Service Plan


*Check the URL


-------------------------------------------------

Migration

How about Change the model?

     *Added new property for model

public class People
{
public int Id { get; set; }
public string Name { get; set; }
public DateTime DateTime { get; set; }
}

     *Added the controller

public ActionResult PutData() {
var db = new MyDbContext();
                var ppl = new People();
ppl.Name = "TEST" + DateTime.Now.ToString();
ppl.DateTime = DateTime.Now;
db.Peoples.Add(ppl);
db.SaveChanges();
return RedirectToAction("Succcess", "Home");
}

     *Modify View

@{
    ViewBag.Title = "Result";
}

@foreach (var ppl in ViewBag.ppls)
{
    @Html.Raw("" + ppl.Name + "-" + ppl.DateTime + "<br>");
}


     *After executing it, you might find a pop-up message
         a. Because the database has been created based on the previous model already, if we modify the model, the mapping between database and model will be failed.


     *In order to conquer this issue, we need to enable the migration feature (Ref: https://msdn.microsoft.com/en-us/data/jj591621)
     *In VS, Tools -> NuGet Package Manager -> Package Manager Console

Enable-Migrations

     *Then you might get the information like this


*
     *Delete the Migration folder and run

Enable-Migrations -EnableAutomaticMigrations

      *We can run the following command on Console to update

Update-Database

      *After that, publish it again. See the result below.


Tuesday, March 13, 2018

Bundling and Minification (AngularJS + ASP.NET MVC)


Purpose

Improve the performance when loading the web page

Central Idea

To reduce the number and size of HTTP requests

Bundle:
make multiple stylesheets or scripts to one file
Minification:
1.        Remove the unused parts of code such as comments, or whitespace
2.       Renaming the variables of JS

Example

Before:


After:


How to do it?

Step 1:
Install the Package (VS - > NuGet)
Install-Package Microsoft.AspNet.Web.Optimization

Step 2:
Create a new file called “BundleConfig.cs” under the folder App_Start


Step 3:
Paste the following sample code
using System.Web.Optimization;

public class BundleConfig
{
    public static void RegisterBundles(BundleCollection bundles)
    {
        bundles.Add(new ScriptBundle("~/bundles/jquery").Include(
            "~/Scripts/jQuery-3.3.1/jquery-3.3.1.slim.js"));

        bundles.Add(new ScriptBundle("~/bundles/popper").Include(
            "~/Scripts/popper-1.12.9/popper.min.js"));

        bundles.Add(new StyleBundle("~/Content/css").Include(
            "~/Styles/styles.css"));

        bundles.Add(new ScriptBundle("~/bundles/app")
            .Include("~/App/app.js")
            .IncludeDirectory("~/App/", "*.js", searchSubdirectories: true));

        // Code removed for clarity.
        BundleTable.EnableOptimizations = true;
    }
}