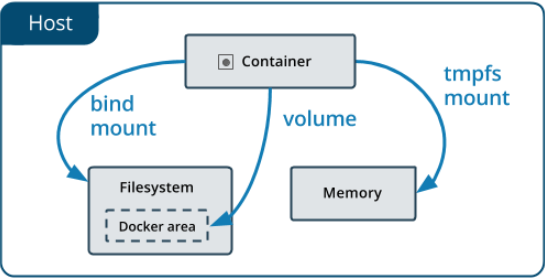
Before introducing how to manage data in Docker, let's use the mysql image to do some experiment to see if data is persist in container or not.
MySQL database
Let's follow the official document to run a mysql container.
Ex:
$ docker container run -d -e MYSQL_ROOT_PASSWORD=secret_pwd mysql
Result:
Unable to find image 'mysql:latest' locally
latest: Pulling from library/mysql
e54b73e95ef3: Pull complete
327840d38cb2: Pull complete
642077275f5f: Pull complete
e077469d560d: Pull complete
cbf214d981a6: Pull complete
7d1cc1ea1b3d: Pull complete
d48f3c15cb80: Pull complete
94c3d7b2c9ae: Pull complete
f6cfbf240ed7: Pull complete
e12b159b2a12: Pull complete
4e93c6fd777f: Pull complete
Digest: sha256:152cf187a3efc56afb0b3877b4d21e231d1d6eb828ca92210...
Status: Downloaded newer image for mysql:latest
3577ab8e698b32d39259372dc6e189386846b60ff11075c1acd981d101ad8c8d
Ex: Check the container status
$ docker container ls -a
Result:
CONTAINER ID IMAGE COMMAND CREATED
3577ab8e698b mysql "docker-entrypoint.s…" 18 seconds ago
STATUS PORTS NAMES
Up 17 seconds 3306/tcp, 33060/tcp youthful_mahavira
Then our MySQL container is up.
Then we can use 'sh' to run mysql commands and create a new database.
Ex:
$ docker container exec -it 3577 sh
# mysql -u root -p
Enter password: (secret_pwd)
mysql> CREATE DATABASE demo;
mysql> SHOW DATABASES;
Result:
+--------------------+
| Database |
+--------------------+
| demo |
| information_schema |
| mysql |
| performance_schema |
| sys |
+--------------------+
5 rows in set (0.00 sec)
The data will be kept if we stop and restart this running container because those data are saved in writable container layer.
Ex:
$ docker container stop 3577
$ docker container start 3577
$ docker container exec -it 3577 sh
$ mysql -u root -p
Enter password: (secret_pwd)
mysql> SHOW DATABASES;
Result:
+--------------------+
| Database |
+--------------------+
| demo |
| information_schema |
| mysql |
| performance_schema |
| sys |
+--------------------+
5 rows in set (0.00 sec)
But if this container is removed and got recreated, then all data are lost.
Ex:
$ docker container stop 3577
$ docker container rm 3577
$ docker container run -d -e MYSQL_ROOT_PASSWORD=secret_pwd mysql
Result:
317d15e11298d1f1afbf2c3050fc002fdfde559e873c3a5ea48050dc570f2ea1
Ex:
$ docker container exec -it 317d sh
$ mysql -u root -p
Enter password: (secret_pwd)
mysql> SHOW DATABASES;
Result:
+--------------------+
| Database |
+--------------------+
| information_schema |
| mysql |
| performance_schema |
| sys |
+--------------------+
4 rows in set (0.00 sec)
How to manage data in docker?
Volumes
Volumes are stored in a part of the host filesystem which is managed by Docker (/var/lib/docker/volumes/ on Linux)
Non-Docker processes should not modify this part of the filesystem.
Volumes are the best way to persist data in Docker.
Let's specific mount when running MySQL container.
Ex:
$ docker container run -d \
--mount source=mysql-data,target=/var/lib/mysql \
-e MYSQL_ROOT_PASSWORD=secret_pwd mysql
Result:
66f2a3d07cc7
We can use the following command to check the volumes.
Ex:
$ docker volume ls
Result:
DRIVER VOLUME NAME
local mysql-data
We even can check it with more details.
Ex:
$ docker volume inspect mysql-data
Result:
[
{
"CreatedAt": "2022-07-15T11:18:58-07:00",
"Driver": "local",
"Labels": null,
"Mountpoint": "/var/lib/docker/volumes/mysql-data/_data",
"Name": "mysql-data",
"Options": null,
"Scope": "local"
}
]
Let's create a new database under this MySQL container.
Ex:
$ docker container exec -it 66f2 sh
# mysql -u root -p
Enter password: (secret_pwd)
mysql> CREATE DATABASE demo;
mysql> SHOW DATABASES;
Result:
+--------------------+
| Database |
+--------------------+
| demo |
| information_schema |
| mysql |
| performance_schema |
| sys |
+--------------------+
5 rows in set (0.00 sec)
Then let's stop and remove this container.
And create a new container and mount the data to the same volume 'mysql-data'.
Ex:
$ docker container stop 66f2
$ docker container rm 66f2
$ docker container run -d \
--mount source=mysql-data,target=/var/lib/mysql \
-e MYSQL_ROOT_PASSWORD=secret_pwd mysql
Result:
3d2360f62b86b3da6cc76360f285dc2745122e8df8d5bf0be457f30e5e459ce4
Then we can find 'demo' database in this new MySQL container.
Ex:
$ docker container exec -it 3d23 sh
$ mysql -u root -p
Enter password: (secret_pwd)
mysql> SHOW DATABASES;
Result:
+--------------------+
| Database |
+--------------------+
| demo |
| information_schema |
| mysql |
| performance_schema |
| sys |
+--------------------+
5 rows in set (0.00 sec)
Bind Mounts
Bind mounts may be stored anywhere on the host system.
Non-Docker processes on the Docker host or a Docker container can modify them at any time.
We can use the following example to see how to launch a static page to nginx container and keep changing it in our host filesystem.
Ex:
$ touch index.html
$ vim index.html
<!doctype html>
<html lang="en">
<head>
<meta charset="utf-8">
<title>Bind Mounts Exp</title>
</head>
<body>
<h2>Hello World</h2>
</body>
</html>
Then we can mount the current folder to nginx container with the following commands.
Ex: $(pwd) means the current folder
$ docker container run -it -d \
-p 8080:80 \
--name web \
--mount type=bind,source=$(pwd),target=/usr/share/nginx/html \
nginx
Result:
2b5cac189c984c07f384020b2ca31f88782d3f0a309573a52ce74d48303dfa8f
Once this nginx container is up, then we can check the browser (localshot:8080), and the page will just simply show 'Hello World'
We can change the index.html directly in our host filesystem, and once we refresh the browser, then we can see the page got changed.
Ex:
$ vim index.html
<!doctype html>
<html lang="en">
<head>
<meta charset="utf-8">
<title>Bind Mounts Exp</title>
</head>
<body>
<h2>Hello Docker</h2>
</body>
</html>
Therefore, using bind mounts, we can make our development experience better.


No comments:
Post a Comment