Thursday, May 2, 2019

Using Hyper-V to install Ubuntu

This note is using windows 10 Pro.

How to enable Hyper-V

1. Control Panel -> Programs and Features - > click Turn Windows features on or off


2. Find the Hyper-V option, and select “Hyper-V Management Tools and Hyper-V Platform


3. Once you click “OK”, you need to restart your computer to apply the changes.


How to create virtual machine through Hyper-V

It can be divided into two parts:

1. Virtual switch (for network accessing)

2. Virtual machine

Create a virtual switch

1. Hyper-V Manager -> Virtual Switch Manager


2. In order to let the virtual machine able to access network, we need to select External option. Then click “Create Virtual Switch


3. Enter the name you want, and select the “External network


4. Click “OK” for the alert message


Creating a virtual machine

1. Action -> New -> click “Virtual Machine…


2. Then you will see the following window to know what this wizard for, and select “Next


3. Choose a descriptive name for your virtual machine. Also, you can change the location to store the virtual machine


4. Then select a generation which is based on your computer


5. Assign memory to this virtual machine. This assigned memory should be considered with your real memory and the operating system you want to install. (for example, Ubuntu need at least 2G)


6. Now, select the virtual switch we created before


7. Setup the virtual hard disk. (Ubuntu needs 25 GB)


8. Installation options. From this experiment, I have download an Ubuntu Image from https://www.ubuntu.com/download/desktop. Therefore, I select the image file option.


9. Summary


10. After that, once you connect to this new virtual machine, the installation wizard of Ubuntu will be launched.

Install Ubuntu

1. First, select a language


2. Then, select “Install Ubuntu


3. Then follow the installation steps to select the language and keyboard

4. On “Updates and other software” steps, you can select “install third-party software for …


5. On “Installation type” steps, select “something else


6. Then double click “/dev/sda” and you will see the pop-up confirmation modal. Click “Continue


7. Then you can see we have the “free space” option from this device, then double click it to split part of them to be the “swap area


8. Then double click “free space” again to make the remaining space to be Ext4.


Select / from the drop-down list


9. Select “ext4” and click “Install Now”. Also, click “Continue” from the pop-up confirmation modal.


10. Select area and enter your login credential. Then, virtual machine will start to install it based on the previous setting.

Saturday, April 27, 2019

Git Basic usage – git init and git clone

This note will go through two ways to generate git repository:
  1. Push existing project to remote repository
  2. Clone remote repository and push the new changes back

Push exiting project to remote repository

First, let’s create a new folder in our local directory, and run the following instructions to generate a new file.

$ mkdir GitTest

$ cd GitTest

$ touch test.html

$ ls -al

Then you can inspect the following screen which indicates that we only have one file called “test.html” under GitTest directory.


Second, use “git init” to convert this “local directory” to “git repository”

$ git init

$ ls -al

After that, .git sub-directory was created after executing “git init”.


As being a git repository, you can start to use “git status” to check this git repository status.

$ git status


Third, using the following instructions to add and commit the changes

$ git add .

$ git commit -m “init”

$ git status

After that, the status will be shown as “working tree clean”.


In the end, we want to push our local commits to central repository. In order to do that, we need to add the remote connection to this local repository. Before starting, let’s use “git remote” command to check it first.

git remote -v

We can tell that there is no remote reference in this local repository.


Using the following instructions to add remote reference.

Before doing that, you need to go to your git provider to create an empty repository first.

In this example, my new repository of my git provider is called “GitTest”.

$ git remote add origin https://github.com/chengys1986/GitTest.git (your own url)

$ git remote -v

Then, you can see you added remote reference successfully.


Now, you are able to use the following instruction to push your local commits to remote repository.

$ git push origin master


Then checking your git provider page, and you will see a new commit!


Clone from remote repository and push new changes back

In order to demonstrate it, please delete the local git repository we created from previous experiment.

$ rm -r GitTest/

Getting URL of your previous remote git repository from your git provider, and using “git clone” to clone it!

$ git clone https://github.com/chengys1986/GitTest.git

After that, you can see the directory is copied from remote to local, and the .git sub-directory is created as well.


Once our local repository is created by cloning command, the remote will be setup automatically.

(For git init section, we need to use “git remote add” command to add the remote reference)


Then use “git status” to check whether the code is clean or not.


Using the following instructions to commit a new change.

$ touch index.html

$ git status

$ git add .

$ git commit -m ‘second commit’
 

Using the following command to push to remote repository.

$ git push origin master


Then checking your git provider page, and you will see a new commit! 

Friday, January 18, 2019

Code-First with existing database


Some online resources indicate that code first technique is for green field project only. However, in the fact that we still can use code first technique with existing database. This note will show how to do it.


First, create a database called “OldDatabase”, and run the following scripts.

/* Table */
CREATE TABLE Region (
RegionId int NOT NULL PRIMARY KEY,
Name varchar(255) NOT NULL
);
GO
CREATE TABLE Office (
OfficeId int NOT NULL PRIMARY KEY,
Name varchar(255) NOT NULL
);
GO
CREATE TABLE Election (
ElectionId int NOT NULL PRIMARY KEY,
Name varchar(255) NOT NULL,
Date date NOT NULL,
RegionId int NOT NULL,
FOREIGN KEY (RegionId) REFERENCES Region(RegionId)
);
GO
CREATE TABLE ElectionOffice
(
 ElectionId int NOT NULL,
 OfficeId int NOT NULL,
 CONSTRAINT PK_ElectionOffice PRIMARY KEY
 (
 ElectionId,
 OfficeId
 ),
 FOREIGN KEY (ElectionId) REFERENCES Election (ElectionId),
 FOREIGN KEY (OfficeId) REFERENCES Office (OfficeId)
)
GO
/* Insert Data */
INSERT INTO [dbo].[Region]
           ([RegionId]
           ,[Name])
     VALUES
           (1
           ,'Region 1')
GO
INSERT INTO [dbo].[Region]
           ([RegionId]
           ,[Name])
     VALUES
           (2
           ,'Region 2')
GO
INSERT INTO [dbo].[Region]
           ([RegionId]
           ,[Name])
     VALUES
           (3
           ,'Region 3')
GO
INSERT INTO [dbo].[Office]
           ([OfficeId]
           ,[Name])
     VALUES
           ('1'
           ,'Office 1')
GO
INSERT INTO [dbo].[Office]
           ([OfficeId]
           ,[Name])
     VALUES
           ('2'
           ,'Office 2')
GO
INSERT INTO [dbo].[Office]
           ([OfficeId]
           ,[Name])
     VALUES
           ('3'
           ,'Office 3')
GO
INSERT INTO [dbo].[Election]
           ([ElectionId]
           ,[Name]
           ,[Date]
           ,[RegionId])
     VALUES
           ('1'
           ,'Election 1'
           ,'2018-01-01'
           ,'1')
GO
INSERT INTO [dbo].[Election]
           ([ElectionId]
           ,[Name]
           ,[Date]
           ,[RegionId])
     VALUES
           ('2'
           ,'Election 2'
           ,'2018-01-02'
           ,'1')
GO
INSERT INTO [dbo].[Election]
           ([ElectionId]
           ,[Name]
           ,[Date]
           ,[RegionId])
     VALUES
           ('3'
           ,'Election 3'
           ,'2018-01-01'
           ,'2')
GO
INSERT INTO [dbo].[Election]
           ([ElectionId]
           ,[Name]
           ,[Date]
           ,[RegionId])
     VALUES
           ('4'
           ,'Election 4'
           ,'2018-01-01'
           ,'3')
GO

INSERT INTO [dbo].[ElectionOffice]
           ([ElectionId]
           ,[OfficeId])
     VALUES
           ('1'
           ,'1')
GO
INSERT INTO [dbo].[ElectionOffice]
           ([ElectionId]
           ,[OfficeId])
     VALUES
           ('1'
           ,'2')
GO
INSERT INTO [dbo].[ElectionOffice]
           ([ElectionId]
           ,[OfficeId])
     VALUES
           ('2'
           ,'2')
GO
INSERT INTO [dbo].[ElectionOffice]
           ([ElectionId]
           ,[OfficeId])
     VALUES
           ('2'
           ,'3')
GO

Second, install Entity Framework to your project (You can refer to previous note to know how to do it)


Third, add the entity model from existing database

    1. On the Project, add new item (right click -> Add -> New Item), and select ADO.NET Entity Data Model, and click “Add”


    2. In the next step, select “Code First from database” option


    3. Setup the connection to your database


    4. Then, select the tables from database you want to include to your model


    5. Then you will find that a file called “CodeFirstTestContext” has been created. 


    From this file, we can see that it used fluent API to override the code first convention.

    Also, under project folder, we can find Entity Framework successfully generate the relating models for us.


Forth, we want to add migration to this project in order easily control database changes by code, not manually change database.


    1. Run the following command on Package Manager Console
        Enable-migrations
        Then you can see the new folder called “Migrations”


    2. Add initial migration

     If you just use “add-migration initModel”, then you will find that entity framework will create duplicate table in snapshot for you. But that is not what we want.

    Refer to Click Me, there are two options to handle this case.

    If we use first option, we can use “Add-Migration initModel –IgnoreChanges” to create an empty migration with current model as a snapshot.

    Then, we can see it created empty "up" and "down" for initModel migration


    3. Then, run the following command to update database
        update-database
    After that, in your database, you can see the MigrationHistory table has been created.


According above, we learn that how to use existing database with code-first technique and migration to our project. 

Thursday, January 10, 2019

Database-first using Entity Framework


Entity Framework provides a way to create a model from the existing database. It’s called “Database First”. For this note, I will give a simple example to indicate how to do it.

First, create a database called “DatabaseFirstTest”, and run the following SQL scripts to create the testing data.

          ------------------------------------------------
/* Tables */
CREATE TABLE Brand(
BrandId int NOT NULL PRIMARY KEY,
Name varchar(255) NOT NULL
);
GO
CREATE TABLE Car(
CarId int NOT NULL PRIMARY KEY,
BrandId int NOT NULL REFERENCES Brand(BrandId),
);
GO
CREATE TABLE Person(
PersonId int NOT NULL PRIMARY KEY,
Name varchar(255) NOT NULL,
);
GO
CREATE TABLE PersonCar(
PersonId int NOT NULL EFERENCES Person(PersonId),
CarId int NOT NULL EFERENCES Car(CarId),
PRIMARY KEY(PersonId, CarId)
);
GO
/* Seeding */
INSERT INTO [dbo].[Brand]
           ([BrandId]
           ,[Name])
     VALUES
           ('1'
           ,'BMW')
INSERT INTO [dbo].[Brand]
           ([BrandId]
           ,[Name])
     VALUES
           ('2'
           ,'Jeep')
INSERT INTO [dbo].[Brand]
           ([BrandId]
           ,[Name])
     VALUES
           ('3'
           ,'Audi')
INSERT INTO [dbo].[Brand]
           ([BrandId]
           ,[Name])
     VALUES
           ('4'
           ,'GMC')
INSERT INTO [dbo].[Brand]
           ([BrandId]
           ,[Name])
     VALUES
           ('5'
           ,'Lexus')
INSERT INTO [dbo].[Brand]
           ([BrandId]
           ,[Name])
     VALUES
           ('6'
           ,'Mazda')
GO
INSERT INTO [dbo].[Car]
           ([CarId]
           ,[BrandId])
     VALUES
           ('1'
           ,'1')
INSERT INTO [dbo].[Car]
           ([CarId]
           ,[BrandId])
     VALUES
           ('2'
           ,'2')
INSERT INTO [dbo].[Car]
           ([CarId]
           ,[BrandId])
     VALUES
           ('3'
           ,'3')
INSERT INTO [dbo].[Car]
           ([CarId]
           ,[BrandId])
     VALUES
           ('4'
           ,'3')
INSERT INTO [dbo].[Car]
           ([CarId]
           ,[BrandId])
     VALUES
           ('5'
           ,'1')
INSERT INTO [dbo].[Car]
           ([CarId]
           ,[BrandId])
     VALUES
           ('6'
           ,'1')
GO
INSERT INTO [dbo].[Person]
           ([PersonId]
           ,[Name])
     VALUES
           ('1'
           ,'Frank')
GO
INSERT INTO [dbo].[Person]
           ([PersonId]
           ,[Name])
     VALUES
           ('2'
           ,'Jake')
GO
INSERT INTO [dbo].[Person]
           ([PersonId]
           ,[Name])
     VALUES
           ('3'
           ,'Mike')
GO
INSERT INTO [dbo].[PersonCar]
           ([PersonId]
           ,[CarId])
     VALUES
           ('1'
           ,'1')
INSERT INTO [dbo].[PersonCar]
           ([PersonId]
           ,[CarId])
     VALUES
           ('1'
           ,'2')
INSERT INTO [dbo].[PersonCar]
           ([PersonId]
           ,[CarId])
     VALUES
           ('2'
           ,'3')
INSERT INTO [dbo].[PersonCar]
           ([PersonId]
           ,[CarId])
     VALUES
           ('2'
           ,'4')
INSERT INTO [dbo].[PersonCar]
           ([PersonId]
           ,[CarId])
     VALUES
           ('3'
           ,'5')
INSERT INTO [dbo].[PersonCar]
           ([PersonId]
           ,[CarId])
     VALUES
           ('1'
           ,'6')
GO

/* Stored Procedure */
CREATE PROCEDURE spGetCarsInformationByPerson 
    @PersonName nvarchar(50)
AS 
SELECT
b.Name as CarBrandName,
Count(b.Name) as CountOfCars
FROM Person p
JOIN PersonCar pc on p.PersonId = pc.PersonId
JOIN Car c on pc.CarId = c.CarId
JOIN Brand b on c.BrandId = b.BrandId
WHERE p.Name = @PersonName
Group by b.Name
GO  
          ------------------------------------------------

Then there are four tables and one stored procedure added to our database.

From this SQL scripts, we can see that Car and Brand is 1-to-Many relationship. Also, it is Many-to-Many relationship between Car and Person. (we assume that many persons could share the same car…and person can own multiple cars)


Second, create a console application and install Entity Framework.

a. Select console App


b. On top menu bar, select Tools -> NuGet Package Manger -> Manage NuGet Packages for Solution…


c. Select EntityFramwork and install it to our project.


Third, we will add the Entity Data Model to our project

a. Right click the current project and select Add -> New Item


b. Then, select “EF Designer from database”

c. Click -> New connection to setup connection detail


d. Mark all tables and store procedures, and click finish


e. Then we can see a diagram created by EF.


Then, we can start to analyze what EF has done for us.

a. On our project folder, previous diagram is bound to EDMX file.


b. If you want to see the detail of this file, you can right-click that EDMX file, and open with XML format.


It seems scared for too much information on previous picture. I will explain it briefly.

a. Definition

SSDL: Store schema definition language

CSDL: Conceptual schema definition language

MSL(C-S mapping): Mapping specification language

b. To make it clear, you can think SSDL is the model of database, and CSDL is the model of entity. And MSL is used to describe how to map model of database and model of entity. If you still feel confused, click “HERE” to get more information.

c. Also, if you update model from database, and you have some changes, such as delete tables, delete fields, rename fields, or change attribute of fields, then SSDL will be update, but CSDL will not be updated. You need to modify CSDL manually.

We can do a quick experiment to see what happens for SSDl, CSDL, and MSL.

a. Let change the table name from Car to Vehicle. Also, change the CarId to VehicleId.


b. Then open EDMX file again.

c. For SSDL, there is no any changes.


d. For CSDL, we found that its name has been changed to Vehicle!


e. For MSL, we can find that it indicates that Entity Vehicle should bind to model Car. Also, VehicleId will bind to CarId as well.


It also provides a visual way to view models.

Just right click the EDMX diagram and select Model Browser. Then you can see the different models from entity or database separately.


Also, you can change the mapping by right click entity from EDMX file, and select “Table Mapping”


Now, we will give an example to show how to use our stored procedure.

a. Paste the following codes on Program.cs

          ------------------------------------------------
var dbContext = new DatabaseFirstTestEntities();
var list = dbContext.spGetCarsInformationByPerson("Frank");
 foreach (var item in list) {
    Console.Write("Brand: {0}, Count: {1}\n",
    item.CarBrandName,
    item.CountOfCars);
}
          ------------------------------------------------

b. Then, you can see the result as following.


c. If you execute the following command in database, you will get the same result.

          ------------------------------------------------
EXECUTE spGetCarsInformationByPerson @PersonName = N'Frank'
          ------------------------------------------------


d. Both results are the same!

However, you might notice that in C#, we do not name function starting with lower case. We also can change it.


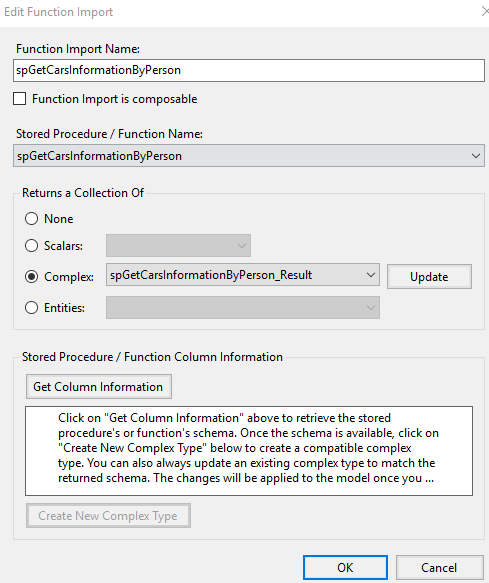
a. On Model Browser, double click spGetCarsInformationByPerson function, then it will pop-up a window to let you edit its name or modify the binding.


b. After that, you can use dbContext.GetCarsInformationByPerson function and trigger the spGetCarsInformationByPerson on database.


According above, we learn how to use database-first to create model in our project!