I divided Notifications into following two pictures. Hopefully, it is helpful to get more insight of how we use it.
A software development enthusiast who has a passion for new technology. I will post things that are interesting or tasks I have encountered.
Tuesday, May 14, 2019
Notifications of ServiceNow
I divided Notifications into following two pictures. Hopefully, it is helpful to get more insight of how we use it.
Events of ServiceNow
The following picture is my note after studying Events of ServiceNow. Hopefully, it can give you a big picture on how it works.
Thursday, May 9, 2019
How to install SSH server to Ubuntu?
Installation
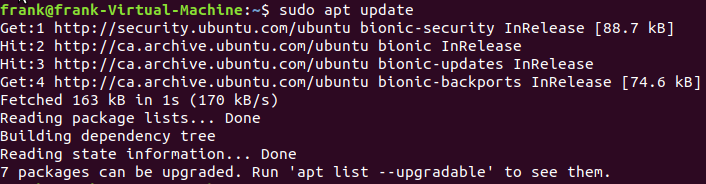
1. Update package list of apt from the repository
$ sudo apt update
2. Install openssh-server. Flag y means that it will assume all the answer will be “yes” from the prompt during installing.
$ sudo apt install -y
openssh-server
3. Using the following instruction to check whether the ssh server is running or not
$ sudo systemctl start ssh
$ sudo systemctl stop ssh
$ sudo systemctl restart ssh
$ sudo systemctl disable ssh
$ sudo systemctl enable ssh
Testing
1. Get the IP address from the remote which launched ssh server
$ ifconfig
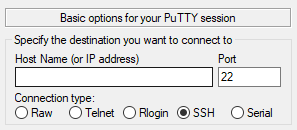
2. (Windows)Using PuTTY to connect it. Enter the IP address gotten from step 1 and select the SSH as connection type.
3. (Linux) Using the following instruction (remember to replace <Username> and <Server IP address> to yours)
$ ssh <Username>@<Server IP address>
4. Then you can see the login information.
Thursday, May 2, 2019
Using Hyper-V to install Ubuntu
This note is using windows 10 Pro.

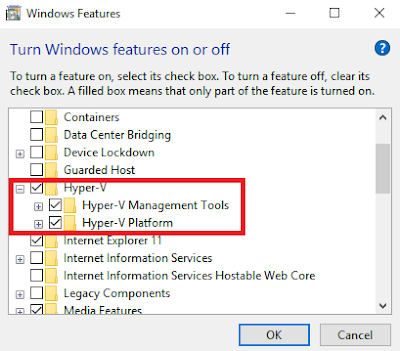
2. Find the Hyper-V option, and select “Hyper-V Management Tools and Hyper-V Platform”
3. Once you click “OK”, you need to restart your computer to apply the changes.
1. Virtual switch (for network accessing)
2. Virtual machine

2. In order to let the virtual machine able to access network, we need to select External option. Then click “Create Virtual Switch”

3. Enter the name you want, and select the “External network”

4. Click “OK” for the alert message


2. Then you will see the following window to know what this wizard for, and select “Next”

3. Choose a descriptive name for your virtual machine. Also, you can change the location to store the virtual machine

4. Then select a generation which is based on your computer

5. Assign memory to this virtual machine. This assigned memory should be considered with your real memory and the operating system you want to install. (for example, Ubuntu need at least 2G)

6. Now, select the virtual switch we created before

7. Setup the virtual hard disk. (Ubuntu needs 25 GB)

8. Installation options. From this experiment, I have download an Ubuntu Image from https://www.ubuntu.com/download/desktop. Therefore, I select the image file option.

9. Summary

10. After that, once you connect to this new virtual machine, the installation wizard of Ubuntu will be launched.

2. Then, select “Install Ubuntu”

3. Then follow the installation steps to select the language and keyboard
4. On “Updates and other software” steps, you can select “install third-party software for …”

5. On “Installation type” steps, select “something else”

6. Then double click “/dev/sda” and you will see the pop-up confirmation modal. Click “Continue”

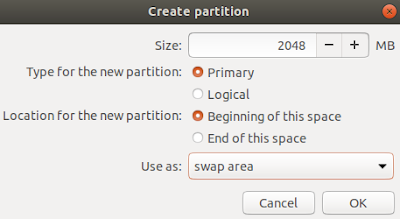
7. Then you can see we have the “free space” option from this device, then double click it to split part of them to be the “swap area”


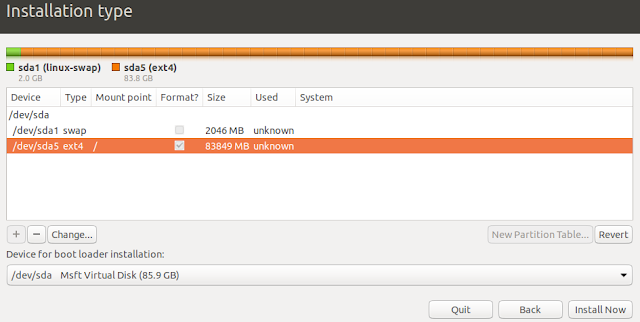
8. Then double click “free space” again to make the remaining space to be Ext4.

Select / from the drop-down list

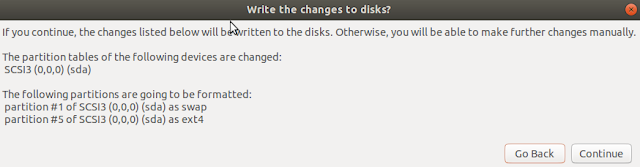
9. Select “ext4” and click “Install Now”. Also, click “Continue” from the pop-up confirmation modal.


10. Select area and enter your login credential. Then, virtual machine will start to install it based on the previous setting.
How to enable Hyper-V
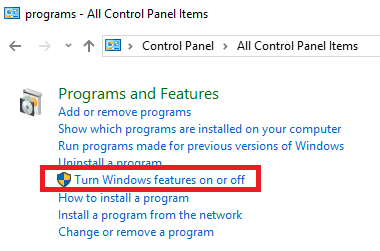
1. Control Panel -> Programs and Features - > click Turn Windows features on or off2. Find the Hyper-V option, and select “Hyper-V Management Tools and Hyper-V Platform”
3. Once you click “OK”, you need to restart your computer to apply the changes.
How to create virtual machine through Hyper-V
It can be divided into two parts:1. Virtual switch (for network accessing)
2. Virtual machine
Create a virtual switch
1. Hyper-V Manager -> Virtual Switch Manager
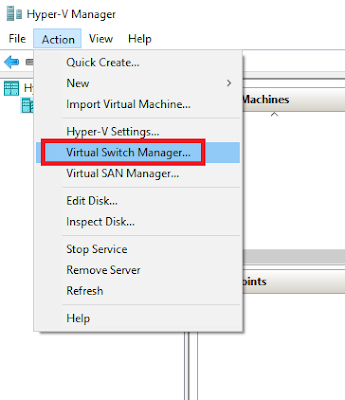
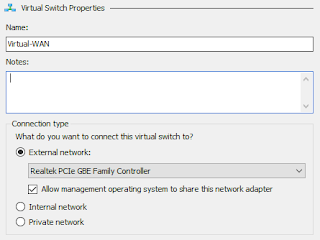
2. In order to let the virtual machine able to access network, we need to select External option. Then click “Create Virtual Switch”

3. Enter the name you want, and select the “External network”

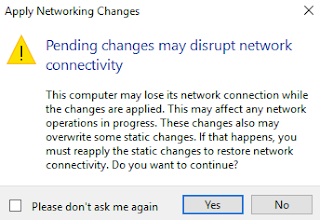
4. Click “OK” for the alert message

Creating a virtual machine
1. Action -> New -> click “Virtual Machine…”
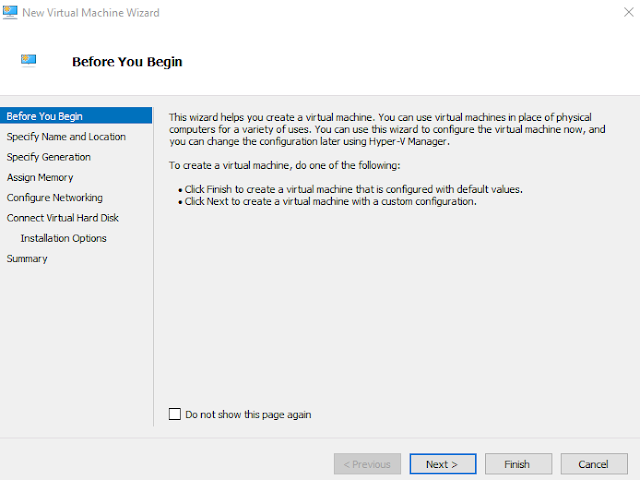
2. Then you will see the following window to know what this wizard for, and select “Next”

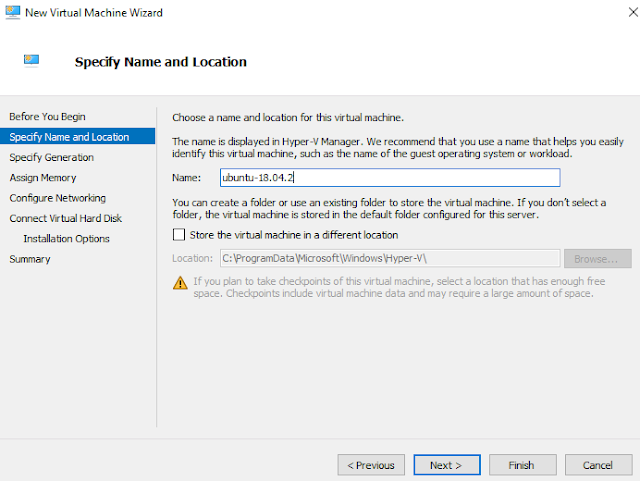
3. Choose a descriptive name for your virtual machine. Also, you can change the location to store the virtual machine
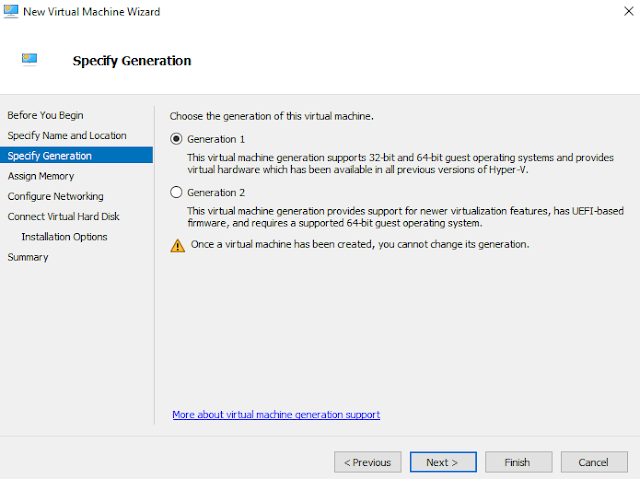
4. Then select a generation which is based on your computer
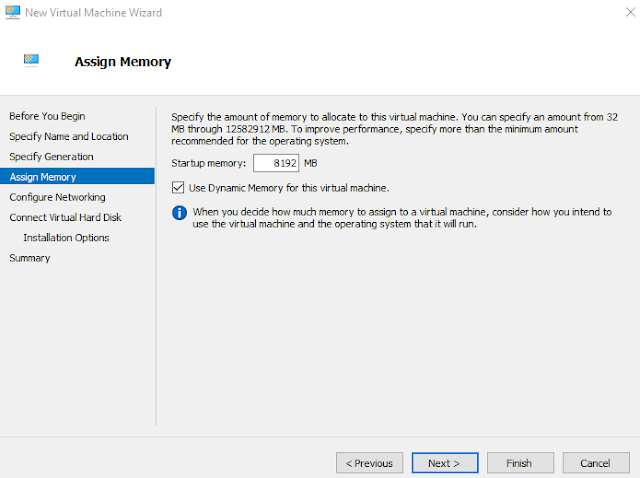
5. Assign memory to this virtual machine. This assigned memory should be considered with your real memory and the operating system you want to install. (for example, Ubuntu need at least 2G)
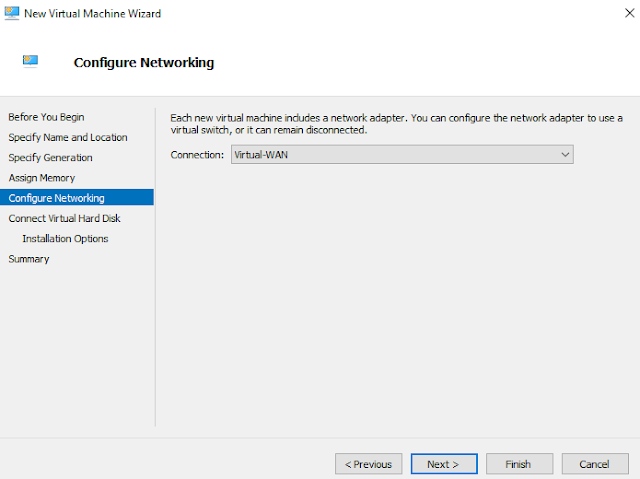
6. Now, select the virtual switch we created before
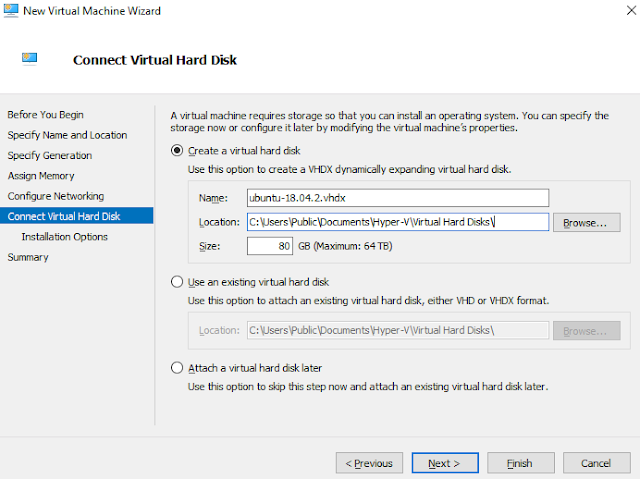
7. Setup the virtual hard disk. (Ubuntu needs 25 GB)
8. Installation options. From this experiment, I have download an Ubuntu Image from https://www.ubuntu.com/download/desktop. Therefore, I select the image file option.
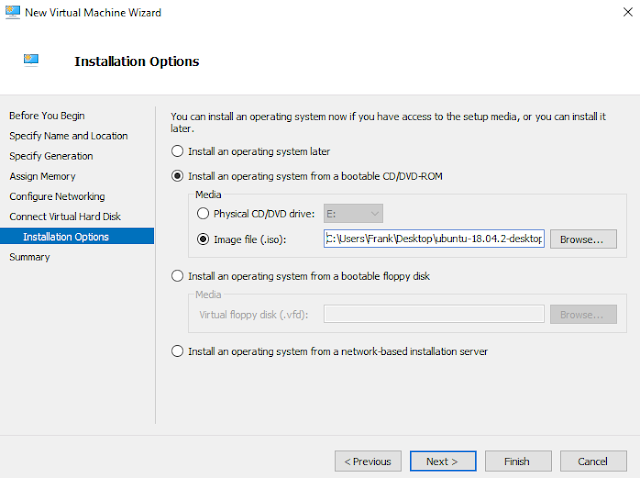
9. Summary
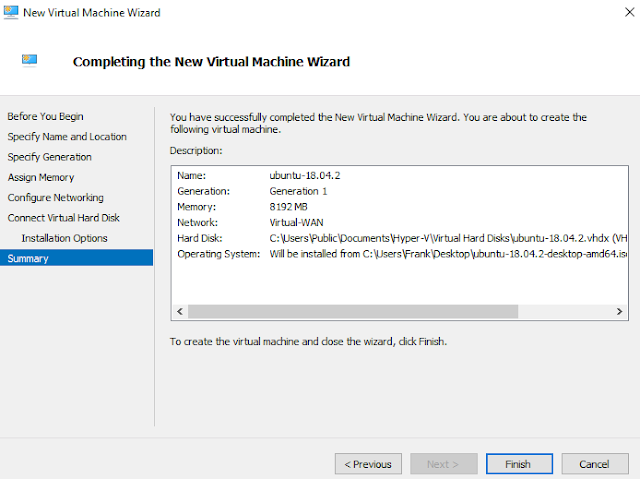
10. After that, once you connect to this new virtual machine, the installation wizard of Ubuntu will be launched.
Install Ubuntu
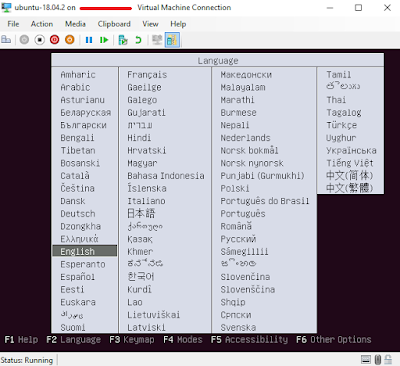
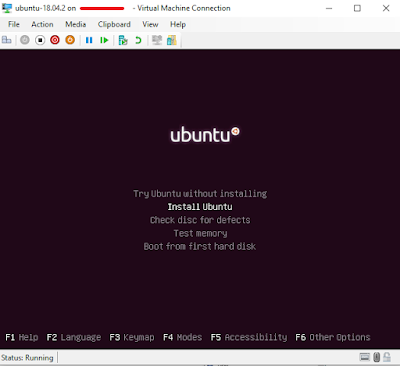
1. First, select a language2. Then, select “Install Ubuntu”
3. Then follow the installation steps to select the language and keyboard
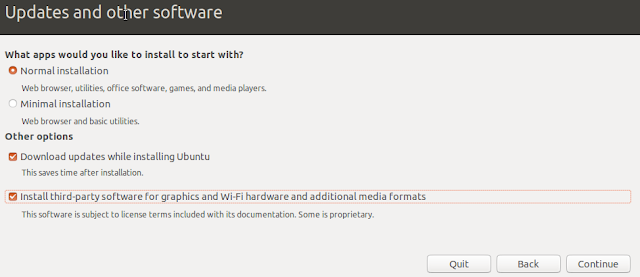
4. On “Updates and other software” steps, you can select “install third-party software for …”
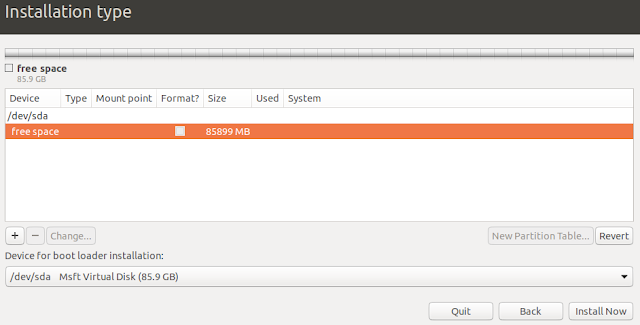
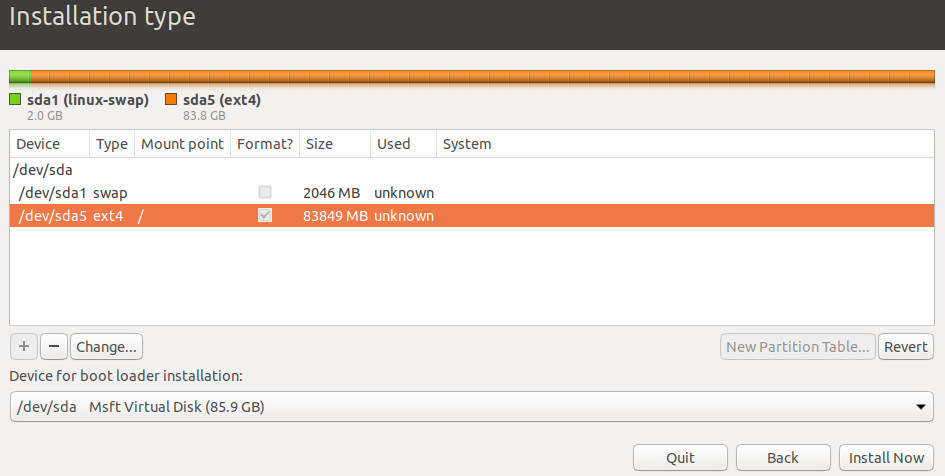
5. On “Installation type” steps, select “something else”
6. Then double click “/dev/sda” and you will see the pop-up confirmation modal. Click “Continue”
7. Then you can see we have the “free space” option from this device, then double click it to split part of them to be the “swap area”
8. Then double click “free space” again to make the remaining space to be Ext4.
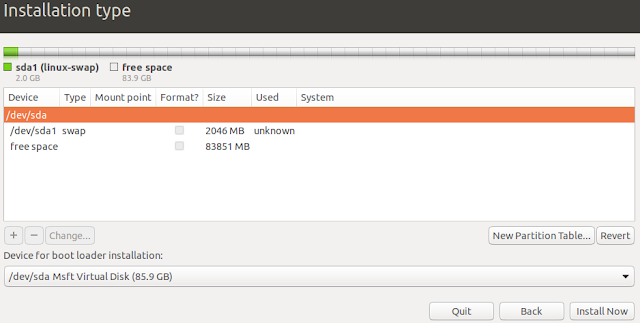
Select / from the drop-down list
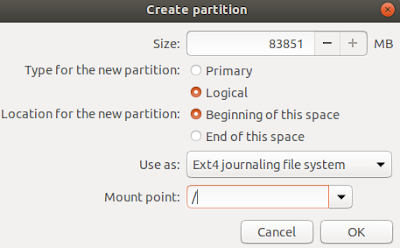
9. Select “ext4” and click “Install Now”. Also, click “Continue” from the pop-up confirmation modal.
10. Select area and enter your login credential. Then, virtual machine will start to install it based on the previous setting.
Saturday, April 27, 2019
Git Basic usage – git init and git clone
This note will go through two ways to generate git repository:
- Push existing project to remote repository
- Clone remote repository and push the new changes back
Push exiting project to remote repository
First, let’s create a new folder in our local directory, and run the following instructions to generate a new file.$ mkdir GitTest
$ cd GitTest
$ touch test.html
$ ls -al
Then you can inspect the following screen which indicates that we only have one file called “test.html” under GitTest directory.
Second, use “git init” to convert this “local directory” to “git repository”
$ git init
$ ls -al
After that, .git sub-directory was created after executing “git init”.
As being a git repository, you can start to use “git status” to check this git repository status.
$ git status
Third, using the following instructions to add and commit the changes
$ git add .
$ git commit -m “init”
$ git status
After that, the status will be shown as “working tree clean”.
In the end, we want to push our local commits to central repository. In order to do that, we need to add the remote connection to this local repository. Before starting, let’s use “git remote” command to check it first.
git remote -v
We can tell that there is no remote reference in this local repository.
Using the following instructions to add remote reference.
Before doing that, you need to go to your git provider to create an empty repository first.
In this example, my new repository of my git provider is called “GitTest”.
$ git remote add origin https://github.com/chengys1986/GitTest.git (your own url)
$ git remote -v
Then, you can see you added remote reference successfully.
Now, you are able to use the following instruction to push your local commits to remote repository.
$ git push origin master
Then checking your git provider page, and you will see a new commit!
Clone from remote repository and push new changes back
In order to demonstrate it, please delete the local git repository we created from previous experiment.$ rm -r GitTest/
Getting URL of your previous remote git repository from your git provider, and using “git clone” to clone it!
$ git clone https://github.com/chengys1986/GitTest.git
After that, you can see the directory is copied from remote to local, and the .git sub-directory is created as well.
Once our local repository is created by cloning command, the remote will be setup automatically.
(For git init section, we need to use “git remote add” command to add the remote reference)
Then use “git status” to check whether the code is clean or not.
Using the following instructions to commit a new change.
$ touch index.html
$ git status
$ git add .
$ git commit -m ‘second commit’
Using the following command to push to remote repository.
$ git push origin master
Then checking your git provider page, and you will see a new commit!
Subscribe to:
Posts (Atom)