Friday, July 15, 2022

Docker 101 - Manage Data


Before introducing how to manage data in Docker, let's use the mysql image to do some experiment to see if data is persist in container or not.


MySQL database


Let's follow the official document to run a mysql container.


Ex:
$ docker container run -d -e MYSQL_ROOT_PASSWORD=secret_pwd mysql

Result:
Unable to find image 'mysql:latest' locally
  latest: Pulling from library/mysql
  e54b73e95ef3: Pull complete
  327840d38cb2: Pull complete
  642077275f5f: Pull complete
  e077469d560d: Pull complete
  cbf214d981a6: Pull complete
  7d1cc1ea1b3d: Pull complete
  d48f3c15cb80: Pull complete
  94c3d7b2c9ae: Pull complete
  f6cfbf240ed7: Pull complete
  e12b159b2a12: Pull complete
  4e93c6fd777f: Pull complete
  Digest: sha256:152cf187a3efc56afb0b3877b4d21e231d1d6eb828ca92210...
  Status: Downloaded newer image for mysql:latest
  3577ab8e698b32d39259372dc6e189386846b60ff11075c1acd981d101ad8c8d

Ex: Check the container status
$ docker container ls -a

Result:
CONTAINER ID   IMAGE     COMMAND                  CREATED          
3577ab8e698b   mysql     "docker-entrypoint.s…"   18 seconds ago  

STATUS          PORTS                 NAMES
Up 17 seconds   3306/tcp, 33060/tcp   youthful_mahavira

Then our MySQL container is up.
Then we can use 'sh' to run mysql commands and  create a new database.

Ex:
$ docker container exec -it 3577 sh
  # mysql -u root -p
  Enter password: (secret_pwd)

  mysql> CREATE DATABASE demo;
  mysql> SHOW DATABASES;

Result:
 +--------------------+
 | Database           |
  +--------------------+
  | demo               |
  | information_schema |
  | mysql              |
  | performance_schema |
  | sys                |
  +--------------------+
  5 rows in set (0.00 sec)

The data will be kept if we stop and restart this running container because those data are saved in writable container layer.

Ex:
$ docker container stop 3577
  $ docker container start 3577
  $ docker container exec -it 3577 sh
  $ mysql -u root -p
  Enter password: (secret_pwd)

  mysql> SHOW DATABASES;

Result:
+--------------------+
  | Database           |
  +--------------------+
  | demo               |
  | information_schema |
  | mysql              |
  | performance_schema |
  | sys                |
  +--------------------+
  5 rows in set (0.00 sec)

But if this container is removed and got recreated, then all data are lost.

Ex:
$ docker container stop 3577
  $ docker container rm 3577
  $ docker container run -d -e MYSQL_ROOT_PASSWORD=secret_pwd mysql

Result:
317d15e11298d1f1afbf2c3050fc002fdfde559e873c3a5ea48050dc570f2ea1

Ex:
$ docker container exec -it 317d sh
$ mysql -u root -p
  Enter password: (secret_pwd)

  mysql> SHOW DATABASES;

Result:
+--------------------+
| Database           |
  +--------------------+
  | information_schema |
  | mysql              |
  | performance_schema |
  | sys                |
  +--------------------+
  4 rows in set (0.00 sec)


How to manage data in docker?


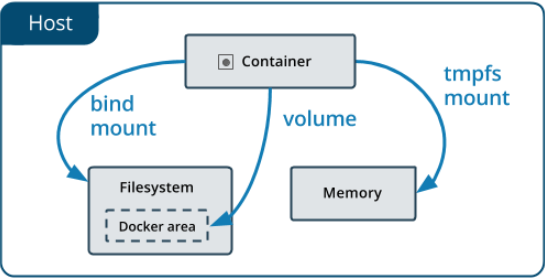
There are two ways to manage Data in Docker: Volumes and Bind Mounts.


Volumes


Volumes are stored in a part of the host filesystem which is managed by Docker (/var/lib/docker/volumes/ on Linux)
Non-Docker processes should not modify this part of the filesystem.
Volumes are the best way to persist data in Docker.

Let's specific mount when running MySQL container.

Ex:
$ docker container run -d  \
    --mount source=mysql-data,target=/var/lib/mysql \
        -e MYSQL_ROOT_PASSWORD=secret_pwd mysql

Result:
66f2a3d07cc7

We can use the following command to check the volumes.

Ex:
$ docker volume ls

Result:
DRIVER    VOLUME NAME
  local     mysql-data

We even can check it with more details.

Ex:
$ docker volume inspect mysql-data

Result:
[
    {
      "CreatedAt": "2022-07-15T11:18:58-07:00",
      "Driver": "local",
      "Labels": null,
      "Mountpoint": "/var/lib/docker/volumes/mysql-data/_data",
      "Name": "mysql-data",
      "Options": null,
      "Scope": "local"
    }
  ]

Let's create a new database under this MySQL container.

Ex:
$ docker container exec -it 66f2 sh
  # mysql -u root -p
  Enter password: (secret_pwd)

  mysql> CREATE DATABASE demo;
  mysql> SHOW DATABASES;

Result:
+--------------------+
| Database           |
+--------------------+
  | demo               |
  | information_schema |
  | mysql              |
  | performance_schema |
  | sys                |
  +--------------------+
  5 rows in set (0.00 sec)

Then let's stop and remove this container.
And create a new container and mount the data to the same volume 'mysql-data'.

Ex:
$ docker container stop 66f2
$ docker container rm 66f2
  $ docker container run -d  \
      --mount source=mysql-data,target=/var/lib/mysql \
      -e MYSQL_ROOT_PASSWORD=secret_pwd mysql

Result:
3d2360f62b86b3da6cc76360f285dc2745122e8df8d5bf0be457f30e5e459ce4

Then we can find 'demo' database in this new MySQL container.

Ex:
$ docker container exec -it 3d23 sh
$ mysql -u root -p
  Enter password: (secret_pwd)

  mysql> SHOW DATABASES;

Result:
+--------------------+
| Database           |
  +--------------------+
  | demo               |
  | information_schema |
  | mysql              |
  | performance_schema |
  | sys                |
  +--------------------+
  5 rows in set (0.00 sec)


Bind Mounts


Bind mounts may be stored anywhere on the host system.
Non-Docker processes on the Docker host or a Docker container can modify them at any time.

We can use the following example to see how to launch a static page to nginx container and keep changing it in our host filesystem.

Ex:
$ touch index.html
$ vim index.html


<!doctype html>
<html lang="en">
<head>
<meta charset="utf-8">
<title>Bind Mounts Exp</title>
</head>
<body>
<h2>Hello World</h2>
</body>
  </html>


Then we can mount the current folder to nginx container with the following commands.

Ex: $(pwd) means the current folder
$ docker container run -it -d  \
-p 8080:80  \
--name web  \
--mount type=bind,source=$(pwd),target=/usr/share/nginx/html  \
nginx

Result:
2b5cac189c984c07f384020b2ca31f88782d3f0a309573a52ce74d48303dfa8f

Once this nginx container is up, then we can check the browser (localshot:8080), and the page will just simply show 'Hello World'


We can change the index.html directly in our host filesystem, and once we refresh the browser, then we can see the page got changed.

Ex:
$ vim index.html

<!doctype html>
<html lang="en">
<head>
<meta charset="utf-8">
<title>Bind Mounts Exp</title>
</head>
<body>
<h2>Hello Docker</h2>
</body>
  </html>


Therefore, using bind mounts, we can make our development experience better.
Sunday, July 3, 2022

Docker 101 - Dockerfile - CMD and ENDTRYPOINT


Dockerfile Instructions - CMD


The main purpose of a CMD is to provide defaults for an executing container.

Take the following experiment as an example, if we use the base image (ubuntu:22.10) without any future configuration in Dockerfile, when running this container, it should use default CMD from base image if we don't pass any CMD.

Dockerfile:
FROM ubuntu:22.10

Ex:
$ docker image build -t cmd-default-exp .

Result:
Sending build context to Docker daemon  2.048kB
  Step 1/1 : FROM ubuntu:22.10
  22.10: Pulling from library/ubuntu
  415d72858c74: Pull complete
  Digest: sha256:d2d9a7a7b18ecb6a33befb2ca9d38646...
  Status: Downloaded newer image for ubuntu:22.10
  ---> 8264e2ec2ece
  Successfully built 8264e2ec2ece
  Successfully tagged cmd-default-exp:latest

If we run this image without passing CMD, it will execute bash.

Ex:
$ docker container run -it cmd-default-exp

Result:
root@fd967f242443:/#

Why? Because base image (ubuntu:22.10) set 'bash' as default CMD.
And we can use image history command to get more image information.

Ex:
$ docker image history cmd-default-exp

Result:
IMAGE          CREATED      CREATED BY                                  
8264e2ec2ece   5 days ago   /bin/sh -c #(nop)  CMD ["bash"]            
  <missing>      5 days ago   /bin/sh -c #(nop) ADD file:440048...

SIZE       COMMENT
0B
70.2MB

In addition, there can only be one CMD instruction in a Dockerfile. If you list more than one CMD then only the last CMD will take effect.

Take the following as an example, in Dockerfile, we will provide another CMD (to replace default CMD from base image).

Dockerfile:
FROM ubuntu:22.10
  CMD ["echo", "Hello World"]

Ex:
$ docker image build -t cmd-override-exp .

Result:
Sending build context to Docker daemon  2.048kB
  Step 1/2 : FROM ubuntu:22.10
  ---> 8264e2ec2ece
  Step 2/2 : CMD ["echo", "Hello World"]
  ---> Running in 35c49b6ad01c
  Removing intermediate container 35c49b6ad01c
  ---> cd72d2059deb
  Successfully built cd72d2059deb
  Successfully tagged cmd-override-exp:latest

Ex:
$ docker container run -it cmd-override-exp

Result:
Hello World

If the user specifies arguments to docker run then they will override the default specified in CMD.

Ex:
$ docker container run -it cmd-override-exp echo 'Hi there'

Result:
Hi there


Dockerfile Instructions - ENTRYPOINT


An ENTRYPOINT allows you to configure a container that will run as an executable.

It may confuse you with CMD instruction. The difference is that CMD is to set the defaults for an executable contianer, and it will be overridden once we pass parameters when we run container.
On the other hand, ENTRYPOINT will not be overridden if we pass parameters, and it will take those parameters as its parameters instead.

Let's start with the basic usage for ENTRYPOINT.

Dockerfile:
FROM ubuntu:22.10 ENTRYPOINT ["echo", "Hello World by ENTRYPOINT"]

Ex:
$ docker image build -t basic-entrypoint .

Result:
Sending build context to Docker daemon  2.048kB
  Step 1/2 : FROM ubuntu:22.10
  ---> 8264e2ec2ece
  Step 2/2 : ENTRYPOINT ["echo", "Hello World by ENTRYPOINT"]
  ---> Running in 928ec8c1c0cb
  Removing intermediate container 928ec8c1c0cb
  ---> deb8931985d6
  Successfully built deb8931985d6
  Successfully tagged basic-entrypoint:latest

Ex:
$ docker container run basic-entrypoint

Result:
Hello World by ENTRYPOINT

Normally, ENTRYPOINT will work with CMD (as default parameters to ENTRYPOINT).

Dockerfile:
FROM ubuntu:22.10
ENTRYPOINT ["echo", "Hello World by ENTRYPOINT"]
  CMD ["and CMD"]


Ex:
$ docker image build -t entrypoint-and-cmd .

Result:
Sending build context to Docker daemon  2.048kB
  Step 1/3 : FROM ubuntu:22.10
  ---> 8264e2ec2ece
  Step 2/3 : ENTRYPOINT ["echo", "Hello World by ENTRYPOINT"]
  ---> Using cache
  ---> deb8931985d6
  Step 3/3 : CMD ["and CMD"]
  ---> Running in c7aa29573689
  Removing intermediate container c7aa29573689
  ---> 3dd20846ece3
  Successfully built 3dd20846ece3
  Successfully tagged entrypoint-and-cmd:latest

Ex:
$ docker container run entrypoint-and-cmd

Result:
Hello World by ENTRYPOINT and CMD

So if we do not pass parameters when running container, then ENDTRYPOINT and CMD will work together. In this case, CMD will be treated as ENDTRYPOINT parameter.

Ex:
$ docker container run entrypoint-and-cmd and Parameters

Result:
Hello World by ENTRYPOINT and Parameters

On the other hand, if we pass parameters when running container, then the default value of CMD will be ignored, and the passed parameters will be treated as ENDTRYPOINT parameters.

Docker 101 - Dockerfile - ENV and ARG


Dockerfile Instructions - ENV


The ENV instruction sets the environment variable <key> to the value <value>.
This value will be in the environment for all subsequent instructions in the build stage and can be replaced inline in many as well.

The environment variables set using ENV will persist when a container is run from the resulting image.

Take the following as an example:

Dockerfile:
FROM python:alpine3.16
  ENV MY_ENV='Hello world'

Ex:
$ docker image build -t env-exp .

Result:
Sending build context to Docker daemon  2.048kB
  Step 1/2 : FROM python:alpine3.16
  ---> b22cfbf3bfa6
  Step 2/2 : ENV MY_ENV='Hello world'
  ---> Running in 66ff3946bdae
  Removing intermediate container 66ff3946bdae
  ---> 215b48c4908f
  Successfully built 215b48c4908f
  Successfully tagged env-exp:latest

Ex:
$ docker container run -it env-exp sh
  / # printenv

Result:
...
  MY_ENV=Hello world
  ...

According to the previous example, the env variables will be persisted inside container.


In addition, it can be adjusted when running a container.

Ex:
$ docker container run --env MY_ENV='modified_when_run' -it env-exp sh
  / # printenv

Result:
...
MY_ENV=modified_when_run
  ...


Environment Variables can be used in certain instructions as variables.


Dockerfile:
FROM python:alpine3.16
  ENV MY_APP_DIR='/app/'
  WORKDIR $MY_APP_DIR
  ADD hello-world.py hello-world.py

Ex:
$ docker image build -t env-as-variable .

Result:
Sending build context to Docker daemon  3.072kB
  Step 1/4 : FROM python:alpine3.16
  ---> b22cfbf3bfa6
  Step 2/4 : ENV MY_APP_DIR='/app/'
  ---> Running in 263cd2a9d616
  Removing intermediate container 263cd2a9d616
  ---> 62f999684aaa
  Step 3/4 : WORKDIR $MY_APP_DIR
  ---> Running in 9e70090d46aa
  Removing intermediate container 9e70090d46aa
  ---> 635bf8e45985
  Step 4/4 : ADD hello-world.py hello-world.py
  ---> d0ee09cd29a5
  Successfully built d0ee09cd29a5
  Successfully tagged env-as-variable:latest

Ex:
$ docker container run -it env-as-variable sh
/app # ls -l
  /app # printenv

Result:
-rw-rw-r--    1 root     root            21 Jun  7 11:59 hello-world.py

  MY_APP_DIR=/app/

Environment variable persistence can cause unexpected side effects.
Therefore, if an environment variable is only needed during build, and not in the final image, consider setting a value for a single command instead or using ARG, which is not persisted in the final image.


Dockerfile Instructions - ARG


The ARG instruction defines a variable that users can pass at build-time to the builder with the docker build command using the --build-arg <varname>=<value> flag.

An ARG instruction can optionally include a default value. If an ARG instruction has a default value and if there is no value passed at build-time, the builder uses the default.

Take the following Dockerfile as an example:
* ARG VERSION and build_no include a default value.
* FROM can interact with ARG
* ${user:-default_user} means if ARG user is not set, then we use default_user instead

Dockerfile:
ARG VERSION=alpine3.16
  FROM python:${VERSION}
  ARG build_no=1
  ARG user
  WORKDIR app
  RUN echo ${build_no} ${user:-default_user} > log.txt

Ex:
$ docker image build -t arg-exp .

Result:
Sending build context to Docker daemon  2.048kB
  Step 1/6 : ARG VERSION=alpine3.16
  Step 2/6 : FROM python:${VERSION}
  alpine3.16: Pulling from library/python
  2408cc74d12b: Pull complete
  2f22aa6a21a6: Pull complete
  54cc066f118a: Pull complete
  03624af3d529: Pull complete
  4ae78d2f3e6f: Pull complete
  Digest: sha256:97725c6081f5670080322188827ef5cd95325...
  Status: Downloaded newer image for python:alpine3.16
  ---> 27edb73bd1fc
  Step 3/6 : ARG build_no=1
  ---> Running in cb48df4b6e52
  Removing intermediate container cb48df4b6e52
  ---> c72fda3ca32e
  Step 4/6 : ARG user
  ---> Running in 0f252e5d4c1a
  Removing intermediate container 0f252e5d4c1a
  ---> 90e61bddcab5
  Step 5/6 : WORKDIR app
  ---> Running in aecbaf0b83b3
  Removing intermediate container aecbaf0b83b3
  ---> d9d2e1f5b94a
  Step 6/6 : RUN echo ${build_no} ${user:-default_user} > log.txt
  ---> Running in 9072470ff1b3
  Removing intermediate container 9072470ff1b3
  ---> 9de14e06b7e5
  Successfully built 9de14e06b7e5
  Successfully tagged arg-exp:latest

Ex:
$ docker container run -it --rm arg-exp sh
  /app # ls
  /app # more log.txt

Result:
log.txt

  1 default_user


Impact on build cache?


ARG variables are not persisted into the built image as ENV variables are. However, ARG variables do impact the build cache in similar ways. If a Dockerfile defines an ARG variable whose value is different from a previous build, then a “cache miss” occurs upon its first usage, not its definition. In particular, all RUN instructions following an ARG instruction use the ARG variable implicitly (as an environment variable), thus can cause a cache miss. Reference

Continue with the previous exp, we build the image again.

Ex:
$ docker image build -t arg-exp .

Result:
Sending build context to Docker daemon  2.048kB
  Step 1/6 : ARG VERSION=alpine3.16
  Step 2/6 : FROM python:${VERSION}
  ---> 27edb73bd1fc
  Step 3/6 : ARG build_no=1
  ---> Using cache
  ---> c72fda3ca32e
  Step 4/6 : ARG user
  ---> Using cache
  ---> 90e61bddcab5
  Step 5/6 : WORKDIR app
  ---> Using cache
  ---> d9d2e1f5b94a
  Step 6/6 : RUN echo ${build_no} ${user:-default_user} > log.txt
  ---> Using cache
  ---> 9de14e06b7e5
  Successfully built 9de14e06b7e5
  Successfully tagged arg-exp:latest

As we can see, cache will be used.

Then if we build image again and pass some arg.

Ex:
$ docker image build --build-arg user=frank -t arg-exp .

Result:
Sending build context to Docker daemon  2.048kB
  Step 1/6 : ARG VERSION=alpine3.16
  Step 2/6 : FROM python:${VERSION}
  ---> 27edb73bd1fc
  Step 3/6 : ARG build_no=1
  ---> Using cache
  ---> c72fda3ca32e
  Step 4/6 : ARG user
  ---> Using cache
  ---> 90e61bddcab5
  Step 5/6 : WORKDIR app
  ---> Using cache
  ---> d9d2e1f5b94a
  Step 6/6 : RUN echo ${build_no} ${user:-default_user} > log.txt
  ---> Running in fd126c3a0481
  Removing intermediate container fd126c3a0481
  ---> cd0ce55baeb9
  Successfully built cd0ce55baeb9
  Successfully tagged arg-exp:latest

And we can see on step 4, there is no cache miss.
Only on step 6, since it is the first time to use ARG user, so the cache miss occur.