Sunday, October 28, 2018

FullCalendar, the Event Calendar

Purpose:


Recently, clients want us to implement a calendar which support event functionality. After researching, we found that FullCalendar is very suitable.


 FullCalendar is open source and support drag-and-drop events functionality.


The document is well defined and the APIs are easy to use.

It also supports various views such as month, week, day, agenda and list view to fit clients' requirement.


Below is a simple example.

1. define HTML element

2. Initialize FullCalender with options
    Note: "evts" is the list of events including the title and event date


3. Result

Monday, October 15, 2018

Quill Rich Text Editor

Purpose:

Sometimes, clients may require us to provide a panel which can allow them to input some information in admin side. After that, we will display that input data in user side with the proper format.

But, they might frequently contact us for the changes of content or styling.

If the input UI we provided for them is powerful enough, things will get easier. They can input the content with styling by themselves. Then, in our part, we just display that formatted content to the user side. That is the win-win situation. We save our time, and clients get more control for the content input.


Quill is free and open source. And it has well-down documentations. It is easy to use it.


Let’s take a look for a simple implementation to know how to get the content of quill editor and set it back.


1. First, initialize quill


2. Then the quill rich text area will be generated with the theme “snow”.


3. If we input something and format it through toolbars, then we can see the special format of quill to understand how quill handle it.


4. Actually, we can convert it to string format and store it to our database


5. Then, if we want to display it to quill editor, we just convert it back to object and use quill API to set it to the editor’s content. Then, magic is happened.


6. In the end, you can see that the stored formatted context can be displayed properly on quill editor.

Sunday, September 23, 2018

Entity Framework Code-First Migration


Purpose: Learn how to use migration history to control your database changes


1.Preparation for Setting Entity Framework, connection string, and relating database


        a. Created a ASP.NET MVC project and install Entity Framework

            Tools -> NuGet Package Manager -> Manage NuGet Packages for Solutions…


        b. Setup connection string
              
                 project -> right click -> Properties


        c. On "Settings" section, select Connection String on Type field, and edit Value…

           Then you can select the relating database to this project.


2. Create Model and setup DbContext

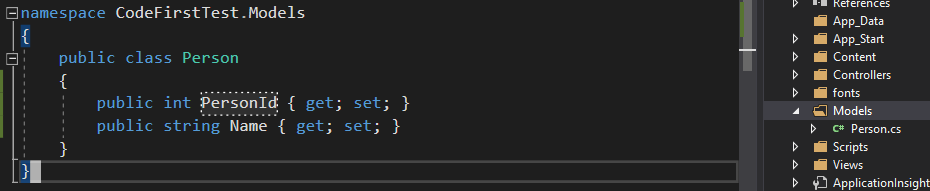
        a. Create a class which represents your table (Under Models folder).

                 For example, if we want to create a Person table, you can setup it as the following picture.
                 Note: Property name ends with Id will be considered as primary key in table. 


        b. Create our DbContext class which inherits DbContext of Entity Framework.
                Note: We use DbContext to coordinate Entity Framework Functionality.

                In addition, add the previous class to DbSet.
                Also, we can specific the database from customized connection string name.
                On this example, we named it “DefaultContext”


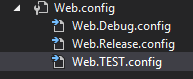
        c. Then, change the connection string to the name we specified on previous step


3. Migration

         
        a. Enable Migration for our project

                 Tools -> NuGet Package Manager -> Package Manager Console


         Run: enable-migrations


        b. Then, we can notice that in our project folder, the Migrations folder was created.


        c. Run: “add-migration init” for creating migration
            Note: "init" is the migration name in this example, you can use anything you want.

            After that, we can see that under the folder, the migration file called “xxxx_init.cs” was created


             Then, we can run "update-database" commands to change database.


        d. On SQL Server management, we can find that the Person table was created!
            In addition, this database includes the migration history table (Only One record.)


4. How to revert migrations


        a. Assume that we keep developing our system, and we want to modify person table for more information to meet clients’ requirement.
             For testing purpose in this example, in this step, we want to deliberately make a mistake for the typo issue. And do the Migration to update database!


        b. On SQL Server Management, we can find that the Person table has been changed, and the new migration history has been inserted.


        c. On this moment, we might find that we make a typo mistake.
            
            We can run the following commands on Console to revert to the specific migration history record.
            
            Commands: update-databse -targetMigration init


        d. Then we can find that the database has been reverted to the first migration we created before. And the second migration history has been removed!


        e. Now, we can delete the wrong migration on our project folder.
            Then, we correct the properties of models (correct the typo). 
            In the end, add the new migration again.


        f. Then, we can check the database and migration history.
            Everything is in control now!


Wednesday, August 22, 2018

Web.config Transform (Visual Studio)


Introduction:

Sometimes, you may encounter a situation that you want your web.config of staging server to be different with the web.config of production server. For example, the connection string of staging server should be different from that of production server (one is for test database, and one is for client database).  

How to create our own transform web.config?

Note: Originally, VS create “Debug” and “Release” configuration for us.

If we want to create our own configuration, select “VS -> Build -> Configuration Manage”.

Then you can see the following picture to create a new configuration.

After creating our customized configuration, on Solution Explorer right click on the web.config, then click “Add Config Transform”.


Then, you can see the one we created has been shown.

How to know the difference through using different transform config?


As default, VS will create “Debug” and “Release” configuration for us. We can use those to be example to declare this question. We found there is only one-line difference between Debug and Release.

<compilation xdt:Transform="RemoveAttributes(debug)" />

From above instruction, we assume that on “Release” build we want to delete the debug attributes.

On Solution Employer, we can right click our project and select Publish…

Then select Folder option.

Then go the file path “source/repos/ConfigTransform/ConfigTransform/bin/Release/PublishOutput” to check the transform web.config.

"Release" version of web.config as shown as following picture.


On the other hand, we want to change the build configuration to “Debug”.
Go to Publish page, click Settings…


And change Configuration to Debug.

Then you can notice that the web.config has been changed! The Debug version contains debug information.


Conclusion:

According above, we can use web.config transform to define the different setting between staging server and production server.

Thursday, August 16, 2018

tmux (session tool)


Introduction


The tool can help to reattach the losing sessions. It is really useful if your network connection is unstable. You can attach the losing session and keep working. In addition, it enables users to control window panes through keyboard.

Installation (Linux):

sudo apt-get update
sudo apt-get install tmux
tmux -V

To start:

In:
tmux new (it will use number to name the session)
tmux new -s name-of-session

Out:
exit
Prefix + d

Commands:


Note: all commands need a prefix  
Default prefix: 
                       ctrl + b

Session

Attach

 tmux a -t number-of-session
 tmux a -t name-of-session

Kill

 tmux kill-session -t number-of-session

List   

 tmux ls

Windows

New: 
  Prefix + c
Kill:  
  Prefix + ,
Moving:
                        Prefix + p
                        Prefix + n
                        Prefix + Number

Panes


New:
  Horizontally:
prefix + “
  Vertically:
prefix + %
Kill:
                        Prefix + x
Moving:
                        Prefix + up|down|left|right
                        Prefix + o

How to customize it?

The keyboard combination of prefix seems to be not that user friendly. If we can change it to something else, that will be really appreciated.

First, we need to create a tmux configuration file.
    vim ~/.tmux.conf

Copy the following instructions into that file.
    unbind c-b
    set -g prefix C-a
    bind C-a send-prefix

The above instructions mean that we change prefix from ctrl + b to ctrl + a.


Reload Config

tmux source-file ~/.tmux.conf