Saturday, May 2, 2020

'Unsubscribe' for HttpClient in Angular?


When studying RxJS in Angular, people always mention that don’t forget to unsubscribe the Observable. Otherwise, it may occur memory leak issues.

Also, people might feel confuse that should we apply this rule to the Observable from HttpClient? Most tutorials tell you that it will be unsubscribed automatically, and you don’t need to worry about it.

Therefore, this note is written for testing HttpClient to see whether it will be unsubscribed automatically or not.

STEPS:

1. Build a simple template angular project through Angular CLI
    ng new my-app
2. Provide a service for HTTP Request
(You can use some free public web API, then you don’t need to build your back-end service)
    // get Random Image of cat from a free public web API
    // The return type is Observable
    getRandomImage(): Observable {
        return this.httpClient.get('https://api.thecatapi.com/v1/images/search');
    }
3. Provide an another service for returning our custom observable whose value will be changed constantly
    export class MyService {
        // Variables
        public myObservalbe$ = new BehaviorSubject('');
        private count = 0;

        // constructor
        constructor() {
            // Keep notify observer for the value change
            interval(1000).subscribe(
                next => {
                    this.myObservalbe$.next('hello_world_' + this.count);
                    this.count++;
                }
            );
        }

        // return our custom Observable
        getMyObservable(): Observable {
            return this.myObservalbe$.asObservable()
        }
    }
4. On ‘app.component.ts’, subscribe both observable from each service we built
    // Variablses
    httpClietSub = null;
    normalSub = null;

    // constructor
    constructor(
        private catImgService: CatImgService,
        private myService: MyService,
    ) { }

    // ngOnInit
    ngOnInit(): void {
        // Subscription from HttpClient
        this.httpClietSub = this.catImgService.getRandomImage().subscribe(
            next => {
                // Do something
            },
        )
        // Subscription from custom Observable
        this.normalSub = this.myService.getMyObservable().subscribe(
            next => {
                // Do something
            },
        )

        // Unsubscribe custom Observable once timer emit an event
        timer(5000, 1000).subscribe(
            next => {
                this.normalSub.unsubscribe();
            }
        );
    }

    // this function is bound to HTML button click event
    // it will log the 'closed' state of each subscription
    onBtnClicked(): void {
        console.log('httpClietSub', this.httpClietSub.closed);
        console.log('normalSub', this.normalSub.closed);
    }
5. Provide a button in ‘app.component.html’ and bind a click event 'onBtnClicked' to log the ‘closed’ status of both subscription
6. Launch the app, and click the button to see the result in Console

Conclusion:

According to the result from above exp, the ‘closed’ state of HttpClient Observable will be ‘true’.

On the other hand, before unsubscribing custom observable, the ‘closed’ state of custom observable subscription always show ‘false’, but it will turn into ‘true’ once the timer is triggered to unsubscribe it.

Therefore, this result prove that we don’t need to worry about ‘unsubscribe’ for HttpClient Observable because it will be unsubscribed automatically

Friday, November 29, 2019

TypeScript - String literal types


Sometimes we'd like to limit input string to some set of values.

We can validate string by ourselves. It is easy, but sometime it is annoying.

The good news is that TypeScript 1.8 has supported 'String Literal Types'. Using it, we can define the set of string value in type level. Check the link for more detail.

Monday, September 30, 2019

PHP Magic method: __call


Function Definition: https://www.php.net/manual/en/language.oop5.overloading.php#object.call

Recently during tracing some PHP library, I saw some interesting ways to use this PHP magic method. The library is built for finding the appropriate phtml and then sending it back to front-end to be displayed. I will write some similar, but simple code to this note to demonstrate it.


Demonstration:

1. Provide two phtml files in the same folder


2. Paste the following code to template.php file.

<?php

class Template
{
    public function __call($name, $arguments)
    {
        $output = '';
        $file = './'. $name . '.phtml';
        if ($file != NULL && file_exists($file)) {
            $output = file_get_contents($file, true);
        }else {
            $output = 'Template not found!\n';
        }
        return $output;
    }
}

$template = new Template;
echo $template->myheader();
echo $template->myfooter();

3. The result will be shown as following after executing template.php.


Summary:

From previous code, because myheader() and myfooter() functions do not exist in template.php, therefore the magic function “__call” will be triggered. Inside “__call” function, we could add some conditions or pass the file path information to make this “template finding library” more flexible. However, in order to make it simple for demonstrating, we only read file content from the generated file name, which is generated by "called function name". 

This usage of this magic function is quiet interesting. That is why I think it is worthy to take this note.

Monday, August 19, 2019

Database View in ServiceNow

The easiest way to query two relational tables in ServiceNow is to use Database Views.
This note will illustrate how to do it step by step.

Preparation:

We will use tables and relationships which were built by the following link: Many-to-Many Relationship in ServiceNow

Demonstration:

1. Open “Database Views” list

Application Employer -> Input “Views”, then select “Database Views” 


2. Then, create a new “Database View”

Click “New” button


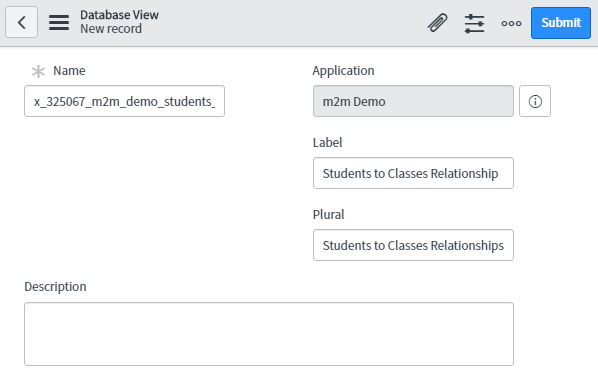
Input some descriptive name, label, and Plural.
For example: I entered “Students to Classes Relationship”


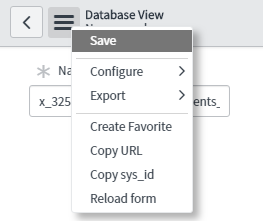
3. Save the new “Database View”

Click left-top “Additional Actions” icon and select “Save”


4. Then we can start to create “View Table” on this “Database View”

On the bottom of the new “Database View” we created, click “New” to generate “View Table”


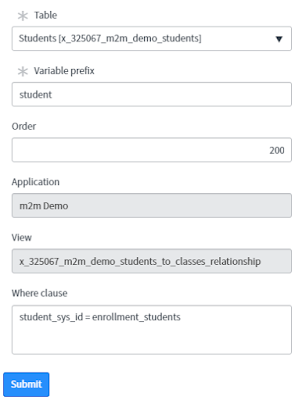
The first “View Table” will be the root table. Therefore, we will leave “Where clause” to be empty.
Also, I set “enrollment” as “Variable prefix” which will be used later to representative which table.

5. After creating a new “View Table”, you can setup which fields will be returned.

Click “New” to create “View Fields”

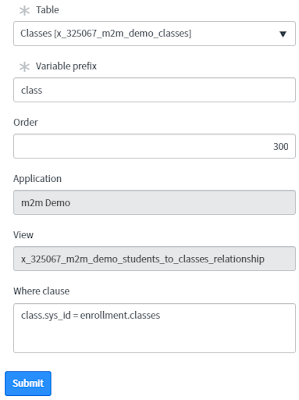
6. Go back to “Database View”, start to create the second “View Table”.

Set the order a little bit higher than the root table. Also, take a look of “Variable prefix” and “Where clause” to see how I join this table to the root table. You might notice that we use “Variable prefix” to differentiate the table if they have the same field name.


Also, you can customize the field from the source table.


7. Create the third “View Table”


Customized fields.


8. After that, let’s test it.

Click “Try It” to see the results on “Database View”.
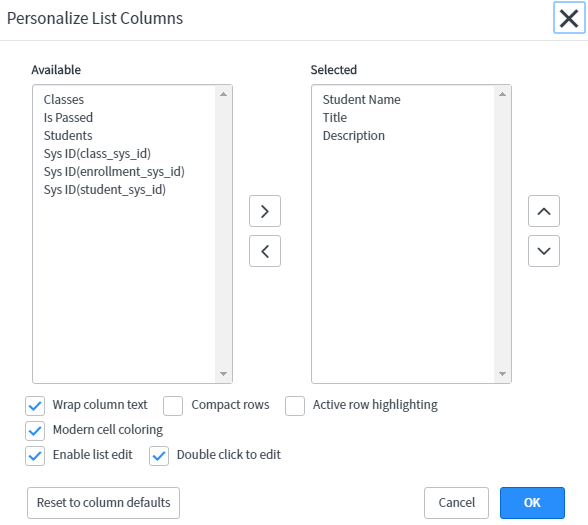
Also, click “Update personalized list” button to customized the list view.


The “Available” fields will be those fields we specify to return for each “View Table”.
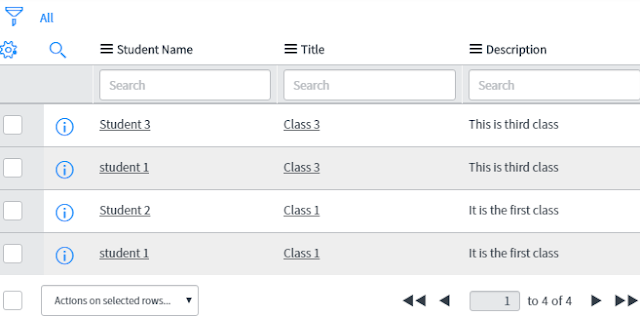
Then the result will be shown like the following picture.


9. Also, we can test it in “Scheduled Script Executions”

Go to Studio -> Create Application File, and select Scheduled Script Execution


Then paste the following code to the script area.


var gr = new GlideRecord ('x_Yours_m2m_demo_students_to_classes_relationship');
gr.query();
while(gr.next()) { 
    gs.info("Student ({0})\t => Class ({1})\t", 
        gr.getValue('student_student_name'),       
        gr.getValue('class_title'));
}


Once you submit it, you can click “Execute Now” to see the results in logs.


Thursday, July 18, 2019

Many-to-Many Relationship in ServiceNow


M2M relationship is common in practical project. Therefore, I’d like to show you how to create M2M relationship in ServiceNow.

Below is the database UML referenced by this experiment.


1. We need to create a test application for this experiment

    Studio -> Click ‘Create Application’ and select ‘Start from scratch’ 

2. Create ‘Students’ and ‘Classes’ table individually.


3. Insert relating columns from UML diagram


4. Then, create the M2M relationship in ServiceNow

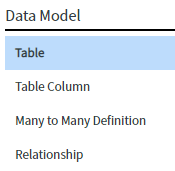
    Studio -> click ‘Create Application File’ and select ‘Many to Many Definition


5. Then setup the relationship between ‘Students’ and ‘Classes’ tables (it doesn’t matter for setting students table as “from” table or “to” table)


6. After that, the new application files were created


7. Then we can add columns to the m2m table

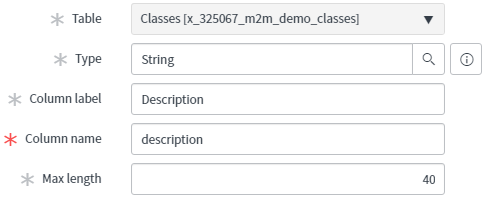
    Studio -> Tables -> click ‘M2m Demo Enrollments’ and click “New” to create Table Columns


8. In order to test it, you can go to “Application Navigator”, and select “System Definition -> Tables”. Then filter ‘M2M Demo Enrollment” table. Then you can find the default UI to insert a new record to this m2m relationship table.


Note:

If you want to delete “M2M Definition”, you need to disable “sys_m2m” -> “delete” of ACL temporarily.