A software development enthusiast who has a passion for new technology. I will post things that are interesting or tasks I have encountered.
Friday, November 29, 2019
TypeScript - String literal types
Sometimes we'd like to limit input string to some set of values.
We can validate string by ourselves. It is easy, but sometime it is annoying.
The good news is that TypeScript 1.8 has supported 'String Literal Types'. Using it, we can define the set of string value in type level. Check the link for more detail.
Monday, September 30, 2019
PHP Magic method: __call
Function Definition: https://www.php.net/manual/en/language.oop5.overloading.php#object.call
Recently during tracing some PHP library, I saw some interesting ways to use this PHP magic method. The library is built for finding the appropriate phtml and then sending it back to front-end to be displayed. I will write some similar, but simple code to this note to demonstrate it.
Demonstration:
1. Provide two phtml files in the same folder
2. Paste the following code to template.php file.
<?php
class Template
{
public function __call($name, $arguments)
{
$output = '';
$file = './'. $name . '.phtml';
if ($file != NULL && file_exists($file)) {
$output = file_get_contents($file, true);
}else {
$output = 'Template not found!\n';
}
return $output;
}
}
$template = new Template;
echo $template->myheader();
echo $template->myfooter();
3. The result will be shown as following after executing template.php.
Summary:
From previous code, because myheader() and myfooter() functions do not exist in template.php, therefore the magic function “__call” will be triggered. Inside “__call” function, we could add some conditions or pass the file path information to make this “template finding library” more flexible. However, in order to make it simple for demonstrating, we only read file content from the generated file name, which is generated by "called function name".
This usage of this magic function is quiet interesting. That is why I think it is worthy to take this note.
Monday, August 19, 2019
Database View in ServiceNow
The easiest way to query two relational tables in ServiceNow is to use Database Views.
This note will illustrate how to do it step by step.


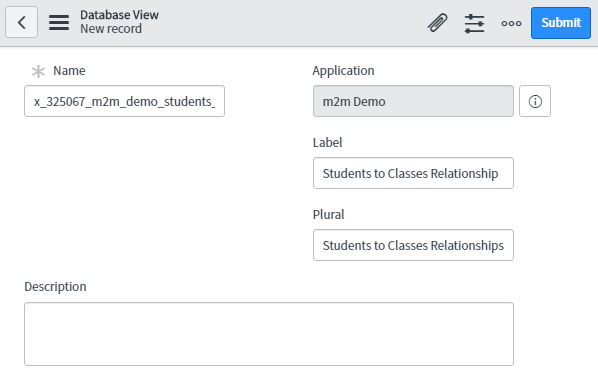
Input some descriptive name, label, and Plural.
For example: I entered “Students to Classes Relationship”

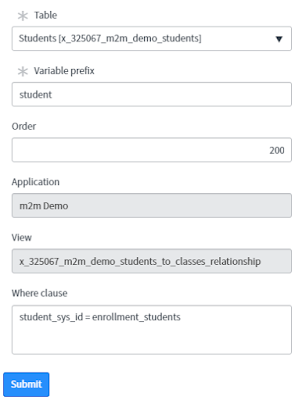
The first “View Table” will be the root table. Therefore, we will leave “Where clause” to be empty.
Also, I set “enrollment” as “Variable prefix” which will be used later to representative which table.


This note will illustrate how to do it step by step.
Preparation:
We will use tables and relationships which were built by the following link: Many-to-Many Relationship in ServiceNowDemonstration:
1. Open “Database Views” list
Application Employer -> Input “Views”, then select “Database Views”
2. Then, create a new “Database View”
Click “New” button
Input some descriptive name, label, and Plural.
For example: I entered “Students to Classes Relationship”

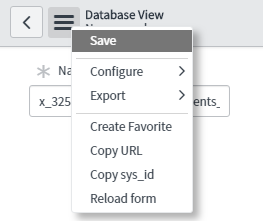
3. Save the new “Database View”
Click left-top “Additional Actions” icon and select “Save”
4. Then we can start to create “View Table” on this “Database View”
On the bottom of the new “Database View” we created, click “New” to generate “View Table”
The first “View Table” will be the root table. Therefore, we will leave “Where clause” to be empty.
Also, I set “enrollment” as “Variable prefix” which will be used later to representative which table.

5. After creating a new “View Table”, you can setup which fields will be returned.
Click “New” to create “View Fields”
6. Go back to “Database View”, start to create the second “View Table”.
Set the order a little bit higher than the root table. Also, take a look of “Variable prefix” and “Where clause” to see how I join this table to the root table. You might notice that we use “Variable prefix” to differentiate the table if they have the same field name.
Also, you can customize the field from the source table.

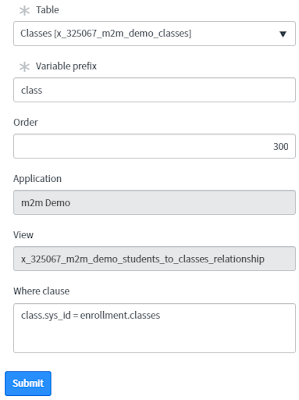
Customized fields.

Also, click “Update personalized list” button to customized the list view.
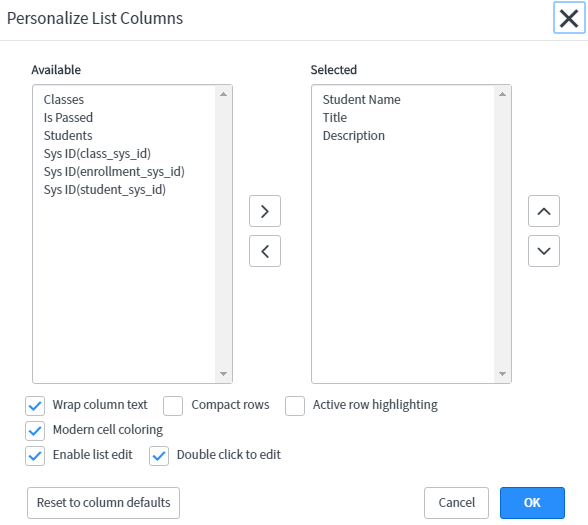
The “Available” fields will be those fields we specify to return for each “View Table”.
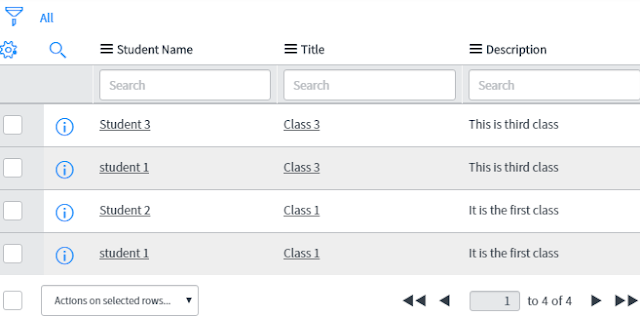
Then the result will be shown like the following picture.

Then paste the following code to the script area.
var gr = new GlideRecord ('x_Yours_m2m_demo_students_to_classes_relationship');
gr.query();
while(gr.next()) {

7. Create the third “View Table”

Customized fields.

8. After that, let’s test it.
Click “Try It” to see the results on “Database View”.Also, click “Update personalized list” button to customized the list view.

The “Available” fields will be those fields we specify to return for each “View Table”.
Then the result will be shown like the following picture.

9. Also, we can test it in “Scheduled Script Executions”
Go to Studio -> Create Application File, and select Scheduled Script Execution
Then paste the following code to the script area.
var gr = new GlideRecord ('x_Yours_m2m_demo_students_to_classes_relationship');
gr.query();
while(gr.next()) {
gs.info("Student ({0})\t => Class ({1})\t",
gr.getValue('student_student_name'),
gr.getValue('class_title'));
}
Thursday, July 18, 2019
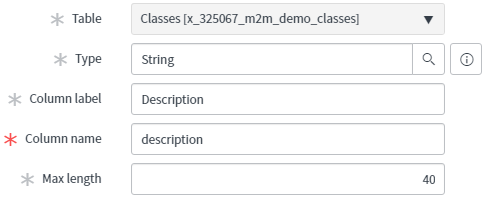
Many-to-Many Relationship in ServiceNow
M2M relationship is common in practical project. Therefore, I’d like to show you how to create M2M relationship in ServiceNow.
Below is the database UML referenced by this experiment.

1. We need to create a test application for this experiment
Studio -> Click ‘Create Application’ and select ‘Start from scratch’2. Create ‘Students’ and ‘Classes’ table individually.
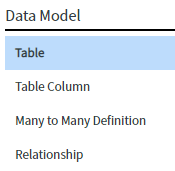
4. Then, create the M2M relationship in ServiceNow
Studio -> click ‘Create Application File’ and select ‘Many to Many Definition’
5. Then setup the relationship between ‘Students’ and ‘Classes’ tables (it doesn’t matter for setting students table as “from” table or “to” table)

6. After that, the new application files were created

7. Then we can add columns to the m2m table
Studio -> Tables -> click ‘M2m Demo Enrollments’ and click “New” to create Table Columns
8. In order to test it, you can go to “Application Navigator”, and select “System Definition -> Tables”. Then filter ‘M2M Demo Enrollment” table. Then you can find the default UI to insert a new record to this m2m relationship table.

Note:
If you want to delete “M2M Definition”, you need to disable “sys_m2m” -> “delete” of ACL temporarily.Saturday, June 29, 2019
Outbound REST Message of ServiceNow
In ServiceNow, there are two ways to generate REST Message:
In Server Side Script, we can directly use “new sn_ws.RESTMessageV2()” to generate REST Message object without creating “Outbound REST Message” in Studio. But it is not handy to test and debug it. In contrast, “Outbound REST Message” provide an easy way to test it and show it in build-in GUI. It can shorten our development time.
Therefore, in this demonstration, I will focus on “Outbound REST message”.
2. Go through the pages of Postman Echo to understand how to send REST request to it. We can take advantage of “Postman Echo” to test our REST clients directly, instead of building our own Web Server.


2. Fill the form’s Name, Description and Endpoint.
Set “Endpoint” to “https://postman-echo.com/get?foo1=${foo1}&foo2=${foo2}”. You can refer to the "Postman Echo" website. Also, select “Authentication type” as “No authentication”
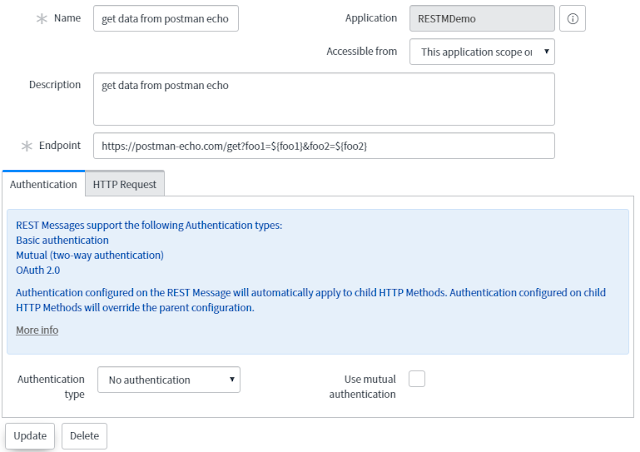
3. Once you save it, the default HTTP methods (Default GET) will be generated automatically. Click it to edit. You can change the name of it if you want.
4. Continue the previous step, click “Auto-generate variables”. Then, you will notice that two new records inserted in “Variable Substitutions”. In order to use Outbound REST Message’s test function, set the “Test value” for those variable substitutions.
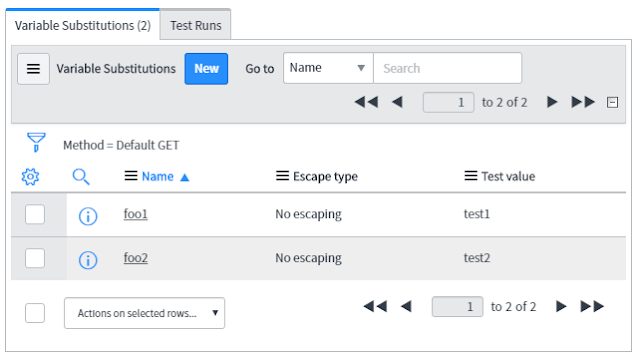
5. Click “Test”, then you will see the REST testing result.
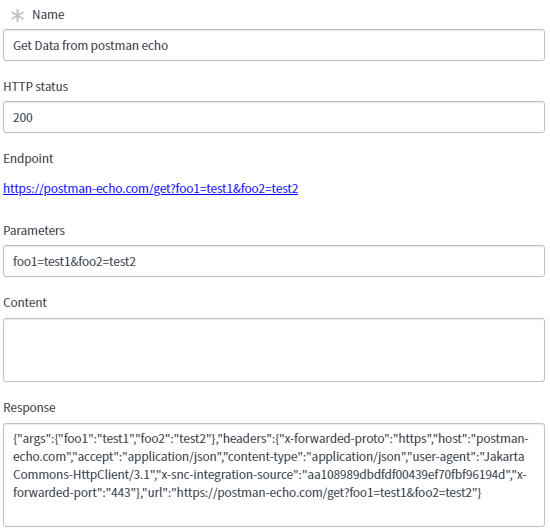
2. Fill the Name, Description and Endpoint.
Set “Endpoint” to “https://postman-echo.com/post”. You can refer to the "Postman Echo" website. Also, select “Authentication type” as “No authentication”
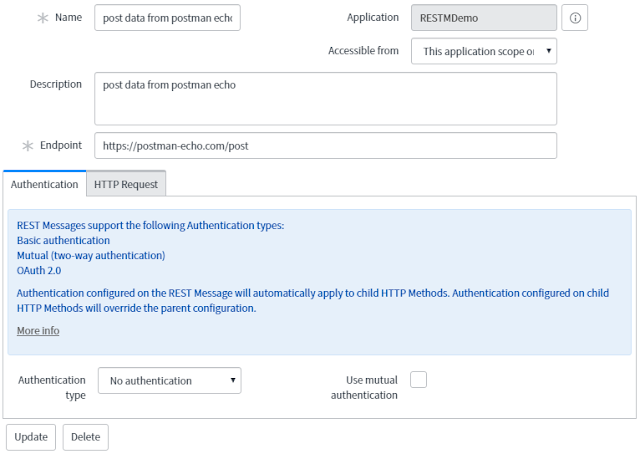
3. Once you save it, the default HTTP methods (Default GET) will be generated automatically. Click it to edit. Change it to “Post” in HTTP method field.
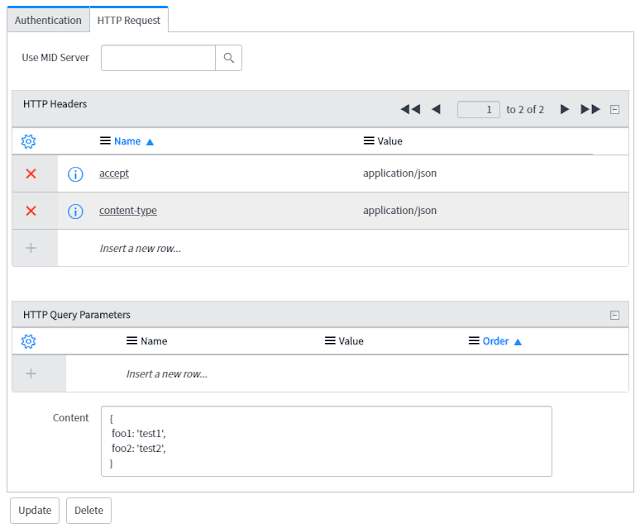
4. Continue to the previous step, insert “accept” and “content-type” with “application/json” value. Also, fill the Content field as the following picture.
5. Click “Test”, then you will see the REST testing result.
1. Outbound REST message
2. Scripting REST Message
In Server Side Script, we can directly use “new sn_ws.RESTMessageV2()” to generate REST Message object without creating “Outbound REST Message” in Studio. But it is not handy to test and debug it. In contrast, “Outbound REST Message” provide an easy way to test it and show it in build-in GUI. It can shorten our development time.
Therefore, in this demonstration, I will focus on “Outbound REST message”.
Preparation
1. Generate a new instance in ServiceNow for this demonstration2. Go through the pages of Postman Echo to understand how to send REST request to it. We can take advantage of “Postman Echo” to test our REST clients directly, instead of building our own Web Server.
Demonstration
HTTP GET
1. In ServiceNow Studio, click “Create Application File” button on the top, and select “REST Message” and then click “Create”
2. Fill the form’s Name, Description and Endpoint.
Set “Endpoint” to “https://postman-echo.com/get?foo1=${foo1}&foo2=${foo2}”. You can refer to the "Postman Echo" website. Also, select “Authentication type” as “No authentication”

3. Once you save it, the default HTTP methods (Default GET) will be generated automatically. Click it to edit. You can change the name of it if you want.
4. Continue the previous step, click “Auto-generate variables”. Then, you will notice that two new records inserted in “Variable Substitutions”. In order to use Outbound REST Message’s test function, set the “Test value” for those variable substitutions.

5. Click “Test”, then you will see the REST testing result.

HTTP POST
1. In ServiceNow Studio, click “Create Application File” button on the top, and select “REST Message” and then click “Create”2. Fill the Name, Description and Endpoint.
Set “Endpoint” to “https://postman-echo.com/post”. You can refer to the "Postman Echo" website. Also, select “Authentication type” as “No authentication”

3. Once you save it, the default HTTP methods (Default GET) will be generated automatically. Click it to edit. Change it to “Post” in HTTP method field.
4. Continue to the previous step, insert “accept” and “content-type” with “application/json” value. Also, fill the Content field as the following picture.

5. Click “Test”, then you will see the REST testing result.
Wednesday, June 19, 2019
Customize ServiceNow baseline form
We can use “Form Design” to change the form view easily if the information we want to add is existed in its relating table record. However, if those information is not stored in form’s relating table, we could use UI Formatter and UI Macros to customize the form view.

Below is a demonstration steps-by-steps.
1. First, we need to create a new app for this demonstration
Open “Studio” -> “Create Application”
-> select “Start from scratch”, and enter your application name.
2. Second, we need to create an “UI Macro” to define the content which will be used by “UI formatter”
On studio, click “Create Application File”,
and select “UI Macro”
3. Then, we need to create an “UI formatter” which need to point out which “UI Macros” it will use.
On studio, click “Create Application File”, and
select “UI formatter”
Note that, the field of “Formatter” should be
the name of “UI Macros” you want to use, and end with the “.xml”
4. In the end, we need to add the defined formatter to the form view we want to change.
On studio, click “Create Application File”, and
select “Form” -> Create
In this demonstration, I select “Default View”
of “Incident [incident]” and add the formatter we created to it.

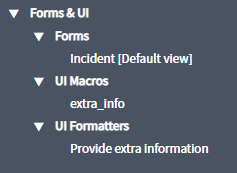
5.The Application Files structure will be shown as following.
6. To test it, open any record from Incident table, you can see the new tab we created through “UI formatter” and “UI Macros”.
Tuesday, May 14, 2019
Notifications of ServiceNow
I divided Notifications into following two pictures. Hopefully, it is helpful to get more insight of how we use it.

Subscribe to:
Comments (Atom)


